Introduction
Active Server Pages (ASP) gives you the freedom to add advanced features to your website.
The aim of this tutorial is to give you an easy, yet thorough and correct introduction to ASP. It starts from scratch but requires that you already have a good knowledge of HTML.ASP can be used in many contexts - discussion forums, polls, shops, SMS gateways, mailing lists, etc. The only limitation with what you choose to do with ASP is your imagination. ASP is not hard to learn, but be aware that ASP is more sophisticated and demanding to learn than HTML. Therefore, patience in the process is a virtue.
What is needed?
It is assumed that you already have a text editor and know how it is used.
Next, you need access to a computer or a server that can run ASP. In contrast to HTML and CSS, ASP is not affected by which browser your visitor use, but by the type of server hosting your pages. This is because ASP is a server-side technology.
In the next few lessons you will learn all about how ASP works, and how to set up your computer to run ASP. After that you'll learn about specific functions and methods.
When you finish this tutorial you will be able to code ASP and thus have access to unlimited possibilities for adding interactivity to your webpages.
ASP is no longer being further developed by Microsoft - it has been replaced by ASP.NET. But ASP is still a fully functional scripting language and you may choose to continue to learn and use ASP (i.e., if your server only supports ASP, you need to maintain an ASP website, etc.).
It is precisely these questions we will look at in this lesson. It's a big help to understand such basics related to ASP before you start developing you own ASP pages. Such basic understanding will increase the speed of learning significantly. So, let's get started!
ASP is developed by Microsoft. It is not really a standard ASP is neither a real programming language nor is it a programming language, but it's a Microsoft technology that lets you use so-called scripting in your documents.
To describe what an ASP page is, you could say that it is a file with the extension .asp that contains a combination of HTML tags and scripts that run on a web server.
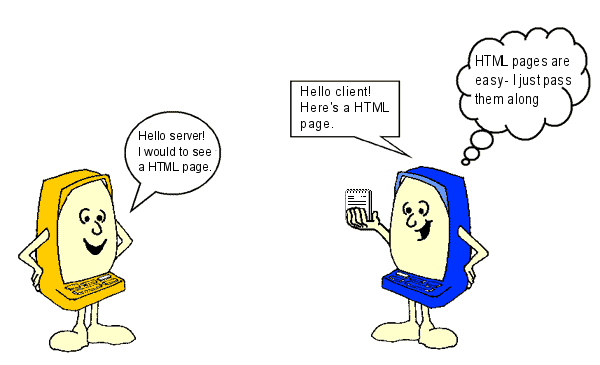 As you can see, the server simply sends an HTML file to the client. But if you instead type http://www.mysite.com/page.asp - and thus request an ASP page - the server is put to work:
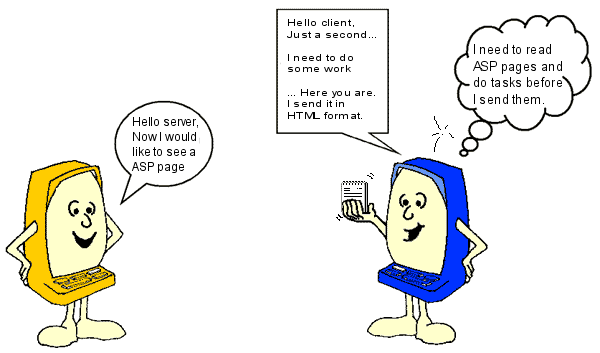 The server first reads the ASP file carefully to see if there are any tasks that need to be executed. Only when the server has done what it is supposed to do, the result is then sent to the client. It is important to understand that the client only sees the result of the server's work - not the actual instructions.
This means that if you click "view source" on an ASP page, you do not see the ASP codes - only basic HTML tags. Therefore, you can not see how an ASP page is made by using "view source". You have to learn ASP in other ways, for example, by reading this tutorial.
What you learn in this tutorial is to write commands to a server!
So, the first thing you need to get hold of is... a server! But don't worry - you don't need to buy a new computer. You just need to install some software on your computer that makes it function as a server. Another option is to have a website on a hosted server that supports ASP. Then you just need to be online while coding.
Since you ultimately only need to choose one option this lesson is divided into different parts. First comes a little introduction on the different options (just choose the one that suits you best). When your server is up and running, we'll pick up with Lesson 3 to make your first ASP page.
The option we want to cover in this lesson is based on the function FormatDateTime. In a later lesson, we will make our own function that can return exactly the format we want. But first, let us look at the predefined options in VBScript.
The NamedFormat argument may take the following values:
Now. But it can be called with any date and time (eg. "14-02-2011 12:34:01")
As an example, we look at the functionMinute which returns a number corresponding to the minutes in the argument (the specified time). The function is called in the following form:
Therefore, to find out what minute we're in right now, we write:
The function returns the number 39 - which is exactly the minutes in the time right now: 02:39:53
The following functions relate similarly to dates or times. As an example they are called withNow (11-07-2012 02:39:53)
Second for? More importantly, when will you learn something you can actually use on your pages?
The answer is that what you learn here are building blocks - the only limitations to what you can build are your creativity and imagination! I would venture to say that you have already learned more than you think. For example, do you think you can make a website with different background images each day of the week and that works in all browsers?
Sure you can! Look at this example:
The example above, with a dynamic background image, simply requires that you make seven images and name them background_1.png, background_2.png, background_3.png, etc.
If a user then enters your site on a Tuesday the site will have background_2.png as background, and the next day, background_3.png. Easy and simple!.
Did you catch it? First we declare the variable t and set the value to 1. Then in each loop, we write a heading at level t (h1, h2, h3, etc.) until t is equal to six.
But be careful! ASP becomes slower the more complicated and extensive the scripts. For instance, look at the next example where, with three loops, we can write over 16 million colors!
In order not to make the page slow, we have drastically reduced the number by putting the step to 30 and thereby limited the number of colors to 512.
In the example, each of three primary colors (red, green and blue) can have a value between 0 and 255. Any combination of the three colors creates a color on the form rgb(255,255,255). The color code is used as color in a <span>.
Loops becomes more useful when you've learned a little more.
If-Then-Else condition, which has the following syntax:
Again, the syntax is very close to ordinary English: If a condition is met Then execute something or Else execute something else.
In lesson 4, you learned how to find the number of a month. In the following example, we will use the month number inIf-Then-Else condition to find out what season it is:
As you can see, it's not a particularly smart condition - it only works when it's March!
However, there are plenty of ways to improve the condition and make it more precise. Below are listed comparison operators that can be used in the statement:
= Equals
< Less than
> Greater than
<= Less than or equal to
> = Greater than or equal to
<> Not equal to
In addition, there are some logical operators:
AND
OR
NOT
The operators can be used to develop more precise conditions, so now we can expand the above example to include all the spring months:
Let us take a closer look at the extended condition:
The condition can be translated into:
But it still only works with March, April and May. All other months are not yet covered by the condition. Let us try to develop the condition a little more.
To write conditions is all about thinking logically and being methodical. The example above is pretty straightforward, but conditions can get very complex.
Select Case method:
This method is based on an expression and then list different "answers" or "values" with related statements. The easiest way to explain the method is to show an example.
As you may remember from lesson 4, the functionWeekday returns the current weekday. This can be used in an example where we write the name of the day (instead of a number):
Often Select Case can be a good alternative to If-Then-Else. What you should use in a given situation depends on which method you find easiest and most logical. Making your scripts logical and clear can be a great challenge.
Therefore, it can be difficult for others (or yourself) to understand how the script is structured, and thus hard to identify and correct errors in the script.
Comments can be used to write short explanatory text in the script. The server completely ignores the comments, and the comments do not affect the actual functionality of the script.
In the business world, it is often a requirement that scripts and programming are commented, otherwise it would be too risky for a company to take over a system in which it would be too difficult to find and correct errors.
Take a look at this example from lesson 5, now with comments:
For the sake of the example, we have included many extra comments, so it should be clear that you are far better off debugging a script with comments than without.
Arrays can be a little difficult in the beginning. But give it a try anyway... we've tried to make it as easy as possible.
Sound confusing? It's actually not that complicated.
Imagine a list of words separated by commas. It is called a comma separated list, and it could, for example, look like this:
Then try to imagine dividing the list at each comma. Next, give each section a unique identification number like this:
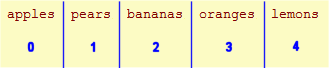 What you see is an array. We can, for example, name the array "fruits". The idea is that we can access the array with a number and get a value back, like this:
fruits(0) = apples
fruits(1) = pears
fruits(2) = bananas
fruits(3) = oranges
fruits 4) = lemons
This is the idea behind arrays. Let us try to use it in practice.
Next, we use the function Split to split the list at each comma:
Voila! "arrFruits" is now an array!
Notice that we called the functionSplit with two arguments:
Let us try to comment the script and put it into an ASP page:
This example is very simple, and it might be a difficult to see the advantage of using an array for this particular task. But just wait... arrays can be used for many very useful things.
When you know how many elements an array contains, it is not a problem defining the loop. You simply start with 0 and let the loop continue to the number of items available. In the example with the fruits, you would loop through the array like this:
As you can see, the variable t (which increase from 0 to 4 in the loop) was used to call the array.
Wouldn't it be nice if we automatically could find out how many elements an array contains?
That is exactly what we can do with the functionsUbound and Lbound, which return respectively the highest and lowest identification number in an array.
With these two functions, we can determine the size of any array. This can be used to create a loop that works regardless of the number of elements:
This loop will work regardless of how many or few elements the array contains.
Notice that we use the function Array instead of the function Split to create an array.
Function .
A function has the following syntax:
This way, we can make a very simple function that can add the value 1 to a number. It could look like this:
Our function is named AddOne and must be called with a number - e.g. 34....
... which (surprise!) will return 35.
The example above processes a number, but functions can work with text, dates or anything else. You can also create functions that are called by many different parameters. In this lesson you will see different examples of functions.
Ok. Now that was almost too simple! But the point was just to show you that a function can be called with more parameters.
Please note how 'ArrMonth' and 'EnglishDateTime' are constructed over several lines. This is done so that users with a low screen resolution better can see the example. The method has no effect on the code itself.
The function above works on all web servers regardless of language. This means that you can use such a function if your website, for example, is hosted on a French server, but you want English dates.
Why is there a question mark after the page name?
The answer is that the characters after the question mark are a HTTP query string. A HTTP query string can contain both variables and their values. In the example above, the HTTP query string contains a variable named id, with the value 1254.
Here is another example:
Again, you have a variable (name) with a value (Joe).
With ASP you will be able to get the value of variable 'name' like this:
So, you use the object Request and QueryString to find the value of a named variable. Let's try it in an example:
When you look at the example above, try to replace the name "Joe" with your own name in the URL and then call the document again! Quite nice, eh?
This URL contains two variables: name and age. In the same way as above, you can get the variables like this:
Let's add the extra variable to the example:
In this lesson, we will look at how to build forms and process inputs on the server.
In our first example, we will look at a very simple form with one text field:
The result in the browser is a form:
 Now we come to the fun part: receiving and handling the data with ASP.
Which returns the value of the text field in the form. Let us try to use it in an example.
First create a page with a form as above. Then make an ASP page named "handler.asp" (notice that this is the name of the page we wrote in the action attribute in our <form>).
The file "handler.asp" shall have the following content:
Which will look like this in the browser:
Now we will use these inputs to create a page that automatically changes background color according to what the user's favorite color is. We can do this by creating a condition (see lesson 6) that uses the data the user has filled out in the form.
The background color will be white if the user has not chosen any favorite color in the form. This is done by using Case Else to specify what should happen if none of the above conditions are met.
But what if the user does not fill out his name? Then it only says "Hello" in the title. We will use an extra condition to change that.
In the example above we use a condition to validate the information from the user. In this case, it might not be so important if the user did not write his name. But as you code more and more advanced stuff, it's vital that you take into account that the user may not always fill out forms the way you had imagined.
As a web developer, such information is of great importance to developing successful web solutions.
Suppose, for example, that you want to make a site where some pages are protected with login and password. To make this protection effective, the password-protected pages should have access to information on whether the user has logged in at an earlier time. You must, in other words, be able to "remember" what the user did earlier.
This is exactly what this lesson is about - how you can use Sessions in ASP to store and retrieve information during a user's visit to your site.
Session object allows you to manage information about a user's session. You can write smart applications that can identify and gather information about users.
A session can begin in different ways. We will not go into technical details here but focus on the case where a session starts by a value is being stored in the Session object. A session ends/dies if the user hasn't requested any pages within in a certain timeframe (by the standard 20 minutes). Of course, you can also always end/kill a session in your script.
Let us say, 50 people are clicking around on the same site, eg. a web shop, at the same time. Information on what they each of them have in their shopping cart would best be stored in the Session object. In order to identify the individual users the server uses a unique user ID that is stored in a cookie. A cookie is a small text file stored on the user's computer - more about cookies in lesson 13. Therefore, sessions often require support of cookies in the user's browser.
I named the item "StartTime" and stored it by adding the following line in my ASP script:
Thereby, a session was started. As described above, each session is given an ID by the server.
Your session has the following ID: 27e89b51b0b051a93bdbc0bc699818c4
At any time, I can call the "StartTime" from the session by writing:
Which would reveal that the page was requested at 7/11/2012 3:16:20 (according to the clock on this web server).
But what is interesting is that the information remains in the Session object, even after you have left this page. The information will follow you until your session ends.
By default, a session lasts for 20 minutes, then it dies automatically. But if you want a session to last longer or shorter, you can define the desired time in minutes this way:
In this case, the session will last for 60 minutes before it dies. Too many sessions at the same time overload the server. Therefore, you should not let sessions run longer than necessary.
If you want to stop a session, it can always be killed in this way:
Let us try to look at another example where sessions are used: a password solution.
The first thing we need is a form where people can enter their username and password. It could look like this:
Then we create the file login.asp.
In this file, we check whether it is the correct username and password that has been entered. If that is the case, we set a session that says that this user is logged in with the correct username and password.
In the protected files, we want to check whether the user is logged in properly. If this is not the case, the user is sent back to the login form. This is how the protection is made:
Most cookies expire (delete themselves) after a predetermined time period, which can range from one minute to several years. But the user can also identify and delete any cookies on his/her computer.
Most browsers - such as Microsoft Internet Explorer, Mozilla Firefox and Google Chrome - can be configured to let the user choose whether or not he/she will accept a cookie. But then, why not just say no to all cookies? It is possible. But many websites would not work as intended without cookies, since cookies in many contexts are used to improve the usability and functionality of the website.
Response.Cookies . In the first example, we will create a cookie and set the value.
First, you need a name for the cookie. In this example we will use the name "HTMLTest". Next, you set the value of the cookie like this:
In this example, we stored information about a user's name and interests. This information can, for example, be useful to target the website specifically for the individual visitor.
Request.Cookies is used. For example, if we need the information from the example above, we do it like this:
The following code sets the cookie:
The cookie is being placed on your hard drive. Depending on what operating system you use, your cookies may be saved in different places. Once you find them, they will probably look like this:
As you can see, a cookie is an normal text file that can be open with for example Notepad. The contents of the cookie we have just created will probably look something like this:
In this lesson we have looked at what cookies can do but not what they can be used for. It's a common concern that some sites use cookies for inappropriate activities. But in most cases, cookies are used to make sites more user-friendly or relevant for the individual users.
If you choose to use cookies on your site it might be a good idea to tell your users that your site uses cookies. This can, for example, be communicated in a privacy policy or registration process.
FileSystemObject you can access the server's filesystem. This allows you to manipulate drives, folders and text files in ASP scripts.
For example, you can use the {0}{1/}FileSystemObject{/0} to read or write a text file. Or you can list all files in a specified folder. There are many possibilities and the FileSystemObject can save you lots of tedious work.
Here, we'll look at how you can use the FileSystemObject to work with drives, folders and files. The goal is to give you a quick overview. In the next lessons, we will look more closely at the different possibilities with the FileSystemObject.
In the example below, we get all the drives on the server listed. This is done by the FileSystemObject, which creates an array with the drives. Each drive letter is then written as we run through the array.
Now we have listed all the drives on the server. It is also possible to retrieve additional information about each drive. For example, let's look closer at the E drive and examine what type of drive it is. For this, we use the property DriveType:
At this time, we will not go into more depth with drives. See Drive Object in the VBScript documentation if you want more information on the different properties, etc.
Folder object, we need to be able to find the physical location of a folder or file.
The problem is that your website normally is hosted on a web-hosting server. Therefore, you probably don't know the physical location of a folder or a file. But help is near: You can use the methodServer.Mappath to find the physical location of any file or folder.
For example, to find the physical location of the folder we are in right now, we write:
Which returns:
We now know that we are in the folder "www2" on drive d at the web server - a very nifty feature!
Let's now use this method together with the FileSystemObject and the FolderObject. We will not go through all the different possibilities - only a few selected. Again, see the documentation for a complete listing.
In exactly the same way as above, we can find the same properties for the file you are looking at now: http://www.html.net/tutorials/asp/lesson14.asp.
FileSystemObject to access the server's filesystem. In this lesson, we will use this learning to read from an ordinary text file.
Text files can be extremely useful for storing various kinds of data. They are not quite as flexible as real databases, but text file typically don't require as much memory. Moreover, text files are a plain and simple format that works on most systems.
OpenTextFile method to open a text file. The syntax is as follows:
First, let's try to open unitednations.txt:
readline, we can read a line from the text file. This method reads until the first line break (but not including the line break).
In this case we chose to loop through all the lines, but we could have achieved the same result with the method ReadAll . If you work with very large text files, be aware that the ReadAll method uses more resources than the ReadLine method. For smaller files, it makes very little difference.
SkipLine, you can skip lines.
This is shown in the example below, where the first 5 lines in the file are skipped and whereafter the sixth line is read:
The file is systematically written with the name of the program, then a comma, and then the domain. As you can probably imagine, more information could easily be stored in this comma-separated data file.
To get the information in each line, we use an array. See Lesson 8 for more information on arrays.
The two methods are very similar, but there is one very important difference: You must have write permissions to the file. This means that the file will have to be located in a folder where you have the necessary permissions.
With most web hosts, you will normally have one folder with write permissions. It's often called something like "cgi-bin", "log", "databases" or something similar. Read more on your web host's support pages. If you work locally on your own computer, you can set the permissions yourself: right-click on the folder and choose "Properties".
Note that it is the text file that needs to be in the folder with write permissions - not the ASP file.
OpenTextFile method is used for writing, but this time we set the mode to 2 (ForWriting) or 8 (ForAppending).
The difference between ForWriting and ForAppending is where the 'cursor' is located - either at the beginning or at the end of the text file.
In the examples in this lesson we use an empty text file called textfile.txt - but you can, of course, make your own text file if you like.
First, let us try to open the text file for writing:
WriteLine, like this:
Since we opened the file "ForWriting", the line is added at the top, and thus overwrites the existing line. If we instead open the file "ForAppending", the line is added at the bottom of the text file, which then will increase by one line each time it's written to.
Write, like this:
In this lesson, we will start by looking at the Access database that we will use in the next lessons. Access is part of the Microsoft Office family and is included in some of the Office suites. You need to have Microsoft Access installed on your computer in order to go through this lesson and the next lessons. A trial version can be downloaded at http://office.microsoft.com.
Below you can download the database used in the examples in this tutorial. In the examples, Access 2010 is used but there are no significant differences in the screens that appear.
 You open the table by double clicking on it. There are many different ways you can work with tables in Access. We will not go into depth with Access as a tool, but only look at the very basics you need to know to use Access as a database for your ASP applications.
The table opens by default in Datasheet View. If you are used to working with spreadsheets, or maybe has used Access before, the table view will look familiar to you with columns and rows:
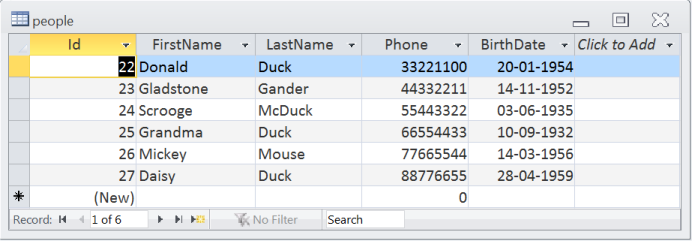 As you can see, in the table, we have listed some of the residents from Duckburg.
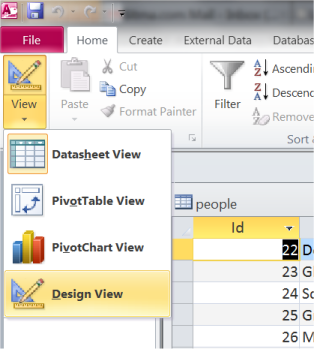
There are primarily two different ways of viewing a table in Access: Design View and Datasheet View. Above, you see the table in Datasheet view, meaning that you see the table with all the values. In the upper left corner of the program you can switch between the two view types:
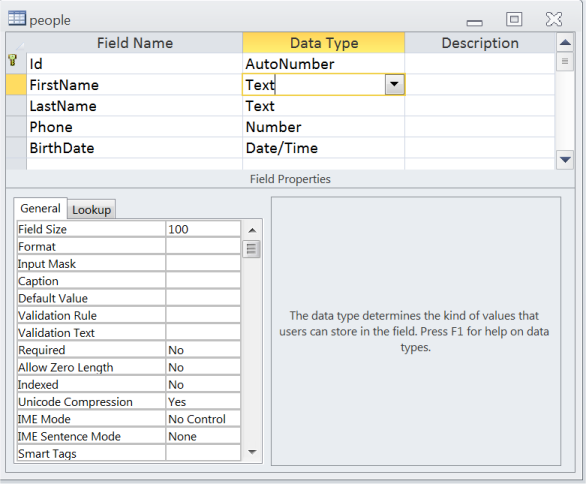
 The Design View gives you an overview of the columns and the data types. In a database, it does matter what type of content there is in a column. In our database, three different data types are used: text, number and date. There are many different options in the Design View. See the help feature in Access for more information.
 This was a short introduction to Microsoft Access. In the beginning, you don't need to change anything in the database and can use it as is. Later, you can create your own databases, which is actually easy and straightforward.
In this lesson, we'll look at how you can create a database connection. There are several options, but the simplest is a so-called DSN-less connection, which means a connection where you do not have to set up a Data Source Name (DSN) on the server, but create a shortcut to the database directly in your code instead.
If you have your own website, you should read about database connections on your host's support pages. Web hosts may have special rules for how to make your database connections.
Again, you should consult your host's support pages for more information. Usually, you will have one folder with write permissions, which are often called "cgi-bin", "log", "databases" or something similar. Conditions vary from host to host, so it is not possible to give a more precise answer. If you work locally on your own computer, you can set the permissions yourself: right-click on the folder and choose "Properties".
Server.MapPath to find the location as described in lesson 14. For example, if the database is in the folder cgi-bin of your website, you will find the physical location like this:
Now we are ready to create the connection. It is done as follows:
This way we have created a database connection, and can begin to retrieve and update data from the database. This is exactly what we will look at in the next lessons.
By the way, keep in mind that it is good practice to close the database connection again when you're finished retrieving or inserting data. This is done with the following code:
This is really one of the most important lessons in this tutorial. Once you have read and understood this lesson, you will realize why database-driven web solutions are so powerful, and your views on web development will be expanded dramatically.
To write such queries, you use the language Structured Query Language (SQL).
Fortunately, SQL is very easy to learn. Try looking at this simple example:
Will be written like this in SQL:
The syntax is pretty self-explanatory. Just read on and see how SQL statements are used in the examples below.
The example shows how data in the table "people" is retrieved with a SQL query.
The SQL query returns a result in the form of a series of records. These records are stored in a so-called recordset. A recordset can be described as a kind of table in the server's memory, containing rows of data (records), and each record is subdivided into individual fields (or columns).
A recordset can be compared to a table, as you know it from the Datasheet View in Access:
Viewed this way, each record can be compared to a row in the table. You can move around in a recordset using the methods MoveNext (go to next record), MovePrevious (go to previous record), MoveFirst (go to the first record), and MoveLast (go to the last record).
The code below shows how to use a recordset:
Notice that for every record how we get the content of the column "FirstName" by typing rs("FirstName"). Similarly, we can get the content of, for example, the column "Phone" by writing rs("Phone").
The order of the recordset is exactly the same as in the table in the database. But in the next example, it will be shown how to sort recordset.
Look at the SQL statement from the example above:
The records can, for example, be sorted alphabetically by the first name of the people this way:
Or chronologically by date of birth like this:
The sorting can be charged from ascending to descending by adding DESC:
In the following example the people are sorted by age:
Try to change the SQL statement yourself and sort the records by first name, last name or phone number.
Say, we only want to retrieve people from the database who hav the phone number "66554433". That could be done like this:
There are six relational operators in SQL:
= Equals
< Less
> Greater Than
<= Less than or equal to
> = Greater than or equal to
<> Not equal to
In addition, there are some logical operators:
AND
OR
NOT
See lesson 6 for more information on how to set up conditions.
In the next example, we use conditions to set up a address book.
For this, we need two files - liste.asp and people.asp - with the following code:
The address book example is rather simple, but it shows the potential of working with ASP and databases.
Imagine that the database had contained 10,000 products with detailed descriptions. By making a few changes in the above files, you could easily create a product catalogue with more than 10,000 pages with only one database and two ASP files.
The SQL statement would then look like this:
This way, the SQL statement is built up by splitting the sentence up into small parts and then putting those parts together in the variable strSQL.
In practice, it makes no difference which method you choose, but once you start working with larger tables, it's crucial that you always keep track.
Try running the following code to insert Gus Goose into the database:
As you've probably already figured out, this can be done by creating a form as described in lesson 11 - where the values from the form fields can be inserted in the SQL statement. Suppose you have a simple form like this:
The form submits to the file insert.asp where you, as shown in lesson 11, can get the user's input by requesting the form content. In this particular example, an SQL statement could look like this:
In the same way, it is possible to retrieve data from cookies, session, QueryString, etc.
An error occurs if you, for example, attempt to insert text or numbers in a date field. Therefore, try to set the data types as precisely as possible.
Below is the most common data types listed:
This can be done with the functionReplace this way:
All ' characters will be replaced with double ' characters, which will be interpreted as single quotes by the database.
Remember that there is no "Recycle Bin" when working with databases and ASP. Once you have deleted a record, it is gone and cannot be restored.
Lesson 1: What is Active Server Pages (ASP)
Whenever anyone is learning ASP, the most common questions that first come up are: What is ASP? And how does it work?It is precisely these questions we will look at in this lesson. It's a big help to understand such basics related to ASP before you start developing you own ASP pages. Such basic understanding will increase the speed of learning significantly. So, let's get started!
What is ASP?
As you can see by the title, ASP is an acronym for Active Server Pages.ASP is developed by Microsoft. It is not really a standard ASP is neither a real programming language nor is it a programming language, but it's a Microsoft technology that lets you use so-called scripting in your documents.
To describe what an ASP page is, you could say that it is a file with the extension .asp that contains a combination of HTML tags and scripts that run on a web server.
How does ASP work?
The best way to explain how ASP works is by comparing it with standard HTML. Imagine you type the address of an HTML document (eg. http://www.mysite.com/page.htm) in the address line of the browser. This way you request an HTML page. It could be illustrated like this: This means that if you click "view source" on an ASP page, you do not see the ASP codes - only basic HTML tags. Therefore, you can not see how an ASP page is made by using "view source". You have to learn ASP in other ways, for example, by reading this tutorial.
What you learn in this tutorial is to write commands to a server!
So, the first thing you need to get hold of is... a server! But don't worry - you don't need to buy a new computer. You just need to install some software on your computer that makes it function as a server. Another option is to have a website on a hosted server that supports ASP. Then you just need to be online while coding.
Lesson 2: Servers
ASP is a server-side technology. Therefore, you need to have a server to run ASP. But it doesn't need to cost you anything to make this upgrade and there are several options for doing so.Since you ultimately only need to choose one option this lesson is divided into different parts. First comes a little introduction on the different options (just choose the one that suits you best). When your server is up and running, we'll pick up with Lesson 3 to make your first ASP page.
- If you use Windows 7
- Windows 7 includes Internet Information Server 7.5 (IIS) and can therefore run ASP.
- If you use Windows XP Professional
- Windows XP Professional includes Internet Information Server 5.1 (IIS) and can therefore run ASP.
- If you use Windows XP Home Edition
- Internet Information Server (IIS) is not included in this edition of Windows XP. However, according to this Usenet post it is possible to install IIS on Windows XP Home Edition. You may want to try this approach. But we recommend you use Windows 7 or Windows XP Professional instead.
- If you use Linux
- It is possible to run ASP on Linux, but we recommend that you use PHP on Linux instead. With PHP you can do pretty much the same as ASP.
- If you use Macintosch
- We know of no option for running ASP on a Macintosh.
- If you have a website on a hosted server
- You can choose to have a website on hosted server which run ASP (like AspHost4Free (free host)), then you are ready to go and can just ftp your ASP pages to the server.
Lesson 3: Your first ASP page
From lesson 1 and 2, you now know a little about what ASP is, and you've installed (or have access to) a server. Now we are ready to begin making our first ASP page. We keep it simple and easy, but after you have gone through this lesson, you will understand much more about what ASP is and what you can do with it. Basically, an ASP file is a text file with the extension .asp which consists of:
- Text
- HTML tags
- ASP Scripts
ASP Scripts
ASP scripts can be written in different languages. The examples in this tutorial are written in Microsoft Visual Basic Scripting Edition (VBScript), but could also be written in another language - eg. JScript. Microsoft has issued detaileddocumentation for VBScript and documentation for ASP Objects. Throughout the tutorial, there will be many links to the documentation. The goal is that you become accustomed to looking up and finding answers to your questions. VBScript is so extensive that you can manage to learn all facets in this tutorial. But VBScipt is not difficult! On the contrary, VBScript is often very similar to plain English.
Let's get started with your first ASP page.
Example: Hello World!
Start by making an ordinary HTML document. But name the file default.asp and place it in the root of the site. On your computer (which is now a server), the path is c:\inetpub\wwwroot\default.asp. The HTML code should look like this:
As you probably remember from lesson 1, ASP is all about writing commands to a server. So let's write a command to the server. First, we need to tell the server when the ASP will start and end. In ASP you use the tags <% and %> to mark the start and end for the ASP codes that the server must execute. Now try to add the following simple code snippet to your HTML code:<html> <head> <title>My first ASP page</title> </head> <body> </body> </html>
When we look at the ASP document in a browser, it should look like this:<html> <head> <title>My first ASP page</title> </head> <body> <% Response.Write "<h1>Hello World!</h1>" %> </body> </html>
But it gets interesting when you look at the HTML code in the browser (by selecting "view source"):
The ASP codes are gone! As you may remember from lesson 1, it is only the server that can see the ASP codes - the client (the browser) only sees the result! Let's look at what happened. We asked the server to write <h1> Hello World!</h1>. In a more technical language, one would say that we used the object Response and the method Write to write a specified string to the client. But do not worry! In this tutorial we try to keep the technical language at a minimum.
Lesson 4: Working with time and dates
In this lesson, we will try to look at the many different options for working with time and dates in ASP. We went through two very simple functions in the previous lesson mostly to show you what ASP is. In this lesson, we will look at some more functions and advanced techniques.
Time and date functions
VBScript contains three important functions that return the current time and/or date on the server: - Now
- Returns the current date and time on the server.
- Date
- Returns the current date on the server.
- Time
- Returns the current time on the server.
<html>
 <head>
 <title>Time and date</title>

 </head>
 <body>
 <%
 Response.Write "<p>The function Now returns: " & Now & "</p>"

 Response.Write "<p>The function Date returns: " & Date & "</p>"

 Response.Write "<p>The function Time returns: " & Time & "</p>"

 %>
 </body>
 </html>
Formatting time and dates
As you've probably noticed, the functions returns the date and time in some very "raw" formats. But there are, of course, different ways to format both the date and time.The option we want to cover in this lesson is based on the function
- FormatDateTime
- Returns a time in specified format
FormatDateTime(Date[, NamedFormat])
- vbLongDate
- vbShortDate
- vbLongTime
- vbShortTime
<html>
 <head>
 <title>time and date</title>
 </head>
 <body>

 <dl>

 <dt>vbLongDate</dt>

 <dd><% Response.Write FormatDateTime(Now, vbLongDate) %></dd>

 <dt>vbShortDate </dt>
 <dd><% Response.Write FormatDateTime(Now, vbShortDate) %></dd>

 <dt>vbLongTime</dt>

 <dd><% Response.Write FormatDateTime(Now, vbLongTime) %></dd>

 <dt>vbShortTime</dt>
 <dd><% Response.Write FormatDateTime(Now, vbShortTime) %></dd>

 </dl>

 <p>
 <%
 Response.Write "Today it is " & datetime format (Now, vbLongDate)
 Response.Write " and the time is " & Format datetime (Now, vbShortTime)

 %>
 </p>

 </body>
 </html>
More functions related to date and time
There are a number of other functions that return parts of a date or time. They are all called with a date or time as an argument. We will not go into depth with them all here, but just show one example and briefly describe the others.As an example, we look at the function
Minute(time)
Minute(Time)
The following functions relate similarly to dates or times. As an example they are called with
- Year
- Returns the current year from a date - with today's date, it returns: 2012
- Month
- Returns the current month from a date - with today's date, it returns: 7
- Day
- Returns the current day of the month from a date - with today's date, it returns: 11
- Weekday
- Returns the current day of the week from a date - with today's date, it returns: 3 NOTE: this function has to be called with the argument "the first day of the week" (eg. Monday or Sunday) as well - like this: Weekday(Now,vbMonday)
- Hour
- Returns the current hour from a time - with the current time, it returns: 2
- Minute
- Returns the current minute from a time - with the current time, it returns: 39
- Second
- Returns the current second from a time - with the current time, it returns: 53
What can you use it for?
All this may seem a bit theoretical at this stage. After all, what on earth can you use a function likeThe answer is that what you learn here are building blocks - the only limitations to what you can build are your creativity and imagination! I would venture to say that you have already learned more than you think. For example, do you think you can make a website with different background images each day of the week and that works in all browsers?
Sure you can! Look at this example:
<html>
 <head>
 <title>time and date</title>
 </head>

 <body background="background_<% =Weekday(Now,vbMonday) %> .png">

 </body>
 </html>
If a user then enters your site on a Tuesday the site will have background_2.png as background, and the next day, background_3.png. Easy and simple!.
- Our first example is obviously not particularly exciting. But just wait! From now on, it's only going to be more and more interesting. Let's look at another example.
Example: Now!
Let's make the server write something else. We could, for example, ask it to write the current date and time:
Will look like this in the browser:<html> <head> <title>My first ASP page</title> </head> <body> <% Response.Write Now %> </body> </html>
And the corresponding HTML code:
Now things are getting interesting, right? We make the server write the date and time when the ASP page is displayed. Note that if you refresh the page in the browser, a new time is written. The server writes the current date and time each time the page is sent to a client. It is also important to note that the HTML code contains only the date - not the ASP codes. Therefore, the example is not affected by which browser is used. Actually, all functionalities that are made with server-side technologies always work in all browsers! In the example, we used Now - which is a function that returns the current date and time on the server.
Let's try to extend the example by writing both a string and a function - separated by & - it's done like this:
Now - which is a function that returns the current date and time on the server.
Let's try to extend the example by writing both a string and a function - separated by & - it's done like this:
Will look like this in the browser:<html> <head> <title>My first ASP document</title> </head> <body> <% Response.Write "<p>Current time: " & Time & "</p>" %> </body> </html>
And the corresponding HTML code:
As you can see, the function Time returns the current time. There are several functions that relate to time and date.
Lesson 5: Loops
In VBScript it is possible to manage the execution of scripts with different control structures. In this lesson, we will look at loops. Loops can be used to repeat parts of a script a specified number of times or until a certain condition is met.
For ... Next
The syntax for aFor ...Next loop is:
The statement is repeated 'expression' minus 'initialization' number of times. If it doesn't make sense, look at this example:For Initializion To Expressions Statement Next
<html>
 <head>
 <title>Loops</title>

 </head>
 <body>

 <%
 Dim t

 For t = 1 to 50
    Response.Write "<p>This text is repeated 50 times</p>"

 Next
 %>

 </body>

 </html>
In the example, a variable named "t" is used. As you can see, we start by writing Dim t, this is called to declare a variable. You do not need to declare your variables, but it's considered to be good code practice, and it makes your code more clear and easier to understand if someone else at a later time has to read through your code. Otherwise the example is almost self explanatory. The loop asks the server to repeat the text while t is between 1 and 50. Each time the loop reaches "Next" the variable t will be increased by 1. It is possible to specify what value that the variable t should be increased by in each loop. This is done with Step as shown in the following example:
<html>
 <head>
 <title>Loops</title>

 </head>
 <body>

 <%
 Dim t

 For t = 1 to 50 Step 5
    Response.Write "<p>variable t is now = " & t & "</p>"

 Next

 %>

 </body>
 </html>
In the example above, t is growing with the value 5 in each loop. Also note how the value t is used as part of the sentence.
Do ... Loop
Another way to make a loop is withDo ...Loop on the form:
Or you can set the condition after Loop instead (no practical difference):Do {While | Until} condition Statement Loop
Regardless of whether you use While or Until, the syntax is almost normal English:Do Statement Loop {While | Until} condition - Until
- Execute until a condition is met.
- While
- Execute while a condition is met.
<html>
 <head>

 <title>Loops </title>
 </head>
 <body>

 <%
 Dim t

 t = 1

 Do Until t = 6

    Response.Write "<h" & t & ">Heading Levels</h" & t & ">"

    t = t + 1

 Loop
 %>

 </body>
 </html>
Loops within loops
In principle, there are no limitations on how loops can be used. For instance, you can easily put loops inside loops and thereby create many repeats.But be careful! ASP becomes slower the more complicated and extensive the scripts. For instance, look at the next example where, with three loops, we can write over 16 million colors!
In order not to make the page slow, we have drastically reduced the number by putting the step to 30 and thereby limited the number of colors to 512.
<html>

 <head>
 <title>Loops </title>
 </head>
 <body>

 <%
 Dim intRed, intGreen, intBlue, strColor

 For intRed = 0 to 255 Step 30

    For intGreen = 0 to 255 Step 30
       For intBlue = 0 to 255 Step 30

    strColor = "rgb (" & intRed & "" & intGreen & "" & intBlue & ")"


    Response.Write "<span style='color:" & strColor & "'>" & strColor & " </span>"

       Next
    Next
 Next
 %>

 </body>
 </html>
Loops becomes more useful when you've learned a little more.
Lesson 6: Conditions
Conditions are used to execute part of a script only if some predefined requirements (conditions) are fulfilled. For example, a condition could be that a date must be after 1/1 2012 or that a variable is greater than 7.If... Then ... Else
The first type of condition we will look at is theIf condition Then
statment
Else
statement
End If
In lesson 4, you learned how to find the number of a month. In the following example, we will use the month number in
<html>
 <head>
 <title>Loops</title>
 </head>
 <body>
 <%

 If Month (Date) = 3 Then

    Response.Write "<p>Now it's spring!</p>"
 Else
    Response.Write "<p>I do not know what season it is!</p>"


 End If

 %>
 </body>
 </html>
However, there are plenty of ways to improve the condition and make it more precise. Below are listed comparison operators that can be used in the statement:
= Equals
< Less than
> Greater than
<= Less than or equal to
> = Greater than or equal to
<> Not equal to
In addition, there are some logical operators:
AND
OR
NOT
The operators can be used to develop more precise conditions, so now we can expand the above example to include all the spring months:
<html>
 <head>
 <title>Loops</title>

 </head>
 <body>
 <%

 If Month(Date)> = 3 AND Month(Date) <= 5 Then

    Response.Write "<p>Now it's spring!</p>"

 Else
    Response.Write "<p>Now it's either winter, summer or autumn!</p>"

 End If

 %>
 </body>
 </html>
Month(Date)> = 3 AND Month(Date) <= 5
If the month is greater than or equal to 3, and the month is less than or equal to 5
Smart, eh? Operators play a significant role in many different parts of ASP.But it still only works with March, April and May. All other months are not yet covered by the condition. Let us try to develop the condition a little more.
If ... Then ... ElseIf ... Else
Using ElseIf, we can expand the condition and make it work for all months:<html> <head> <title>Loops</title> </head> <body> <% If Month(Date)> = 3 AND Month(Date) <= 5 Then Response.Write "<p>Now it's spring!</p>" Elseif Month(Date)> = 6 AND Month(Date) <= 8 Then Response.Write "<p>Now it's summer!</p>" Elseif Month(Date)> = 9 AND Month(Date) <= 11 Then Response.Write "<p>Now it's autumn!</p>" Else Response.Write "<p>Now is the winter!</p>" End If %> </body> </html>
Select ... Case
Another way of writing conditions is to use theSelect Case Expression
Case 1
statement
Case 2
statement
Case Else
statement
End Select
As you may remember from lesson 4, the function
<html>
 <head>
 <title>Loops </title>
 </head>
 <body>
 <%

 Select Case Weekday(Now,vbMonday)

 Case 1
    Response.Write "Monday"
 Case 2
    Response.Write "Tuesday"
 Case 3

    Response.Write "Wednesday"

 Case 4
    Response.Write "Thursday"
 Case 5
    Response.Write "Friday"

 Case 6
    Response.Write "Saturday"
 Case Else

    Response.Write "Sunday"

 End Select

 %>
 </body>
 </html>
Lesson 7: Comment your scripts
As you may have noticed, ASP scripts can easily look confusing. In this lesson, we cover why comments are important and how to insert them into your scripts.Why is it important to comment your scripts?
When you are coding, you are writing commands to a server/computer and need to use a highly formal language which may not clearly reflect your thoughts when making the script.Therefore, it can be difficult for others (or yourself) to understand how the script is structured, and thus hard to identify and correct errors in the script.
Comments can be used to write short explanatory text in the script. The server completely ignores the comments, and the comments do not affect the actual functionality of the script.
In the business world, it is often a requirement that scripts and programming are commented, otherwise it would be too risky for a company to take over a system in which it would be too difficult to find and correct errors.
How do you insert comments?
It is quite easy to insert a comment. You simply start the comment with an apostrophe: " ' ".Take a look at this example from lesson 5, now with comments:
<html>
 <head>
 <title>Loops</title>
 </head>
 <body>

 <%
 ' Here we write color codes using three loops

 ' Three variables for the colors (red, green and blue)
 ' and a variable for the color code:
 Dim intRed, intGreen, intBlue, strColor

 ' Red can be between 0 and 255
 For intRed = 0 to 255 Step 30

    ' Green can be between 0 and 255

    For intGreen = 0 to 255 Step 30

       ' Blue can be between 0 and 255
       For intBlue = 0 to 255 Step 30

       ' The color code is made on the form rgb(red,green,blue)

       strColor = "rgb(" & intRed & "," & intGreen & "," & intBlue & ")"


       ' Now we write the color code to the client

       Response.Write "<span style='color: " & strColor & "'>" & strColor & " </span>"

       ' Repeat loop
       Next
    Next
 Next
 %>

 </body>

 </html>
Lesson 8: Arrays
In this lesson we will look at what an array is, how it is used, and what it can do.Arrays can be a little difficult in the beginning. But give it a try anyway... we've tried to make it as easy as possible.
What is an array?
An array is a set of indexed elements where each has its own, unique identification number.Sound confusing? It's actually not that complicated.
Imagine a list of words separated by commas. It is called a comma separated list, and it could, for example, look like this:
apples, pears, bananas, oranges, lemons
fruits(0) = apples
fruits(1) = pears
fruits(2) = bananas
fruits(3) = oranges
fruits 4) = lemons
This is the idea behind arrays. Let us try to use it in practice.
How do you use an array?
We will continue with the fruit example. Step by step, we will make it work as a real array. First, we set a variable equal to the list of fruits:<% Dim fruitlist fruitlist = "apples, pears, bananas, oranges, lemons" %>
<%
 Dim fruitlist, arrFruits

 fruitlist = "apples, pears, bananas, oranges, lemons"

 arrFruits = Split(fruitlist,",")
 %>
Notice that we called the function
- the list that should be split
- and the delimiter - i.e., the character used to split (in this case a comma) in quotation marks: ",".
Let us try to comment the script and put it into an ASP page:
<html>
 <head>
 <title>Array</title>
 </head>
 <body>

 <%

 ' Two variables for the list and the array

 Dim fruitlist, arrFruits

 ' Comma separated list
 fruitlist = "apples, pears, bananas, oranges, lemons"

 ' Create an array by splitting the list (with comma as delimiter)
 arrFruits = Split(fruitlist,",")

    ' Write the values from our array

    Response.Write "<p>The list of fruits:</p>

    Response.Write "<ul>"

    Response.Write "<li>" & arrFruits(0) & "</li>"
    Response.Write "<li>" & arrFruits(1) & "</li>"

    Response.Write "<li>" & arrFruits(2) & "</li>"
    Response.Write "<li>" & arrFruits(3) & "</li>"

    Response.Write "<li>" & arrFruits(4) & "</li>"
    Response.Write "</ul>"

 %>

 </body>
 </html>
Loop through an array
Back in lesson 5 you learned about loops. Now we will look at how you can loop through an array.When you know how many elements an array contains, it is not a problem defining the loop. You simply start with 0 and let the loop continue to the number of items available. In the example with the fruits, you would loop through the array like this:
<html>
 <head>
 <title>Array</title>

 </head>
 <body>

 <%
 ' Two variables for the list and the array

 Dim fruitlist arrFruits

 ' Comma separated list
 fruitlist = "apples, pears, bananas, oranges, lemons"

 ' Create an array by splitting the list (with comma as delimiter)
 arrFruits = Split(fruit list ,",")

    Response.Write "<p>List of fruits:</p>
    Response.Write "<ul>"

    ' Loop through the array arrFrugt

    For t = 0 to 4
       Response.Write "<li>" & arrFruits (t) & "</li>
    Next

    Response.Write "</ul>"
 %>

 </body>
 </html>
How to find the size of an array
But what if we add another fruit to the list? Then our array will contain an element more - which will get the identification number 5. Do you see the problem? Then we need to change the loop, so it runs from 0 to 5, or else not all of the elements will be included.Wouldn't it be nice if we automatically could find out how many elements an array contains?
That is exactly what we can do with the functions
With these two functions, we can determine the size of any array. This can be used to create a loop that works regardless of the number of elements:
<%
    For t = LBound(arrFrugt) to UBound(arrFrugt)
       Response.Write arrFruits(t)
    Next
 %>
Another example
Below is another example of how you can use an array to write the name of the month:<html> <head> <title>Array<title> </head> <body> <% ' A variable for the names of the months Dim arrMaaneder ' Note the comma before January - because there is no month with the number 0 arrMaaneder = Array(,"January","February","March","April","May","June","July","August","September","October","November","December") ' Call the array with the number of the month - write to the client Response.Write arrMaaneder(Month(Date)) %> </body> </html>
Lesson 9: Functions
In previous lessons you have learned to use functions like Ubound and Weekday. In this lesson, you will learn to create your own functions usingWhat is a function?
A function process inputs and return an output. It can be useful if, for example, you have a wide range of data you have processed or if you have calculations or routines in other ways that must be performed many times.A function has the following syntax:
Function Name(list of parameters)
    Statement
 End Function
Function AddOne(t)
    t = t + 1
    AddOne = t
 End Function
Response.Write AddOne(34)
The example above processes a number, but functions can work with text, dates or anything else. You can also create functions that are called by many different parameters. In this lesson you will see different examples of functions.
Example: Function with more parameters
As mentioned above, you can easily create a function that can be called with more parameters. In the next example, we'll create a function that is called with three numbers and then returns the value of the three numbers added together:<html> <head> <title>Functions</title> </head> <body> <% Function AddAll(number1, number2, number3) AddAll = number1 + number2 + number3 End Function Response.Write "123 + 654 + 9 equals " & AddAll(123,654,9) %> </body> </html>
Ok. Now that was almost too simple! But the point was just to show you that a function can be called with more parameters.
Example: English date and time
Let us try to make a slightly more complex function. A function that's called with a date and time returns it in the format: Wednesday, 15 February, 2012, 10:00:00 AM<html> <head> <title> Loops </title> </head> <body> <% Function EnglishDateTime(strDate) ' Array with the English names for days of the week arrDay = "Monday, Tuesday, Wednesday, Thursday, Friday, Saturday, Sunday" arrDay = Split(arrDay,",") ' Array with the English names of the months arrMonth = "January,February,March,April,May,June,July,August," arrMonth = arrMonth & "September,October,November,December" arrMonth = Split(arrMonth,",") ' The date is constructed EnglishDateTime = arrDay(Weekday(strDate,vbMonday)) & ", " & Day(strDate) " EnglishDateTime = EnglishDateTime & arrMonth(Month(srDate)) & ", " & Year(strDate) EnglishDateTime = EnglishDateTime & ", " & FormatDatetime(strDate, vbLongTime) End Function ' Test function Response.Write EnglishDateTime(Now) %> </body> </html>
The function above works on all web servers regardless of language. This means that you can use such a function if your website, for example, is hosted on a French server, but you want English dates.
Lesson 10: Passing variables in a URL
When you work with ASP, you often need to pass variables from one page to another. This lesson is about passing variables in a URL.How does it work?
Maybe you have wondered why some URLs looks something like this:http://html.net/page.asp?id=1254
The answer is that the characters after the question mark are a HTTP query string. A HTTP query string can contain both variables and their values. In the example above, the HTTP query string contains a variable named id, with the value 1254.
Here is another example:
http://html.net/page.asp?navn=Joe
How to get the variable with ASP?
Let's say you have an ASP page named people.asp. Now you call this page using the following URL:people.asp?name=Joe
Request.QueryString("name")
<html>
 <head>
 <title>QueryString</title>
 </head>
 <body>
 <%

 ' The value of the variable is found

 Response.Write "<h1>Hello " & Request.QueryString("name") & "</h1>"
 %>
 </body>

 </html>
Several variables in the same URL
You are not limited to pass only one variable in a URL. By separating the variables with &, multiple variables can be passed:people.asp?name=Joe&age=24
Request.QueryString("name")
 Request.QueryString("age")
<html>
 <head>
 <title>QueryString </title>
 </head>
 <body>
 <%
 ' The value of the variable name is found

 Response.Write "<h1>Hello" & Request.QueryString("name") & "</h1>"

 ' The value of the variable age is found

 Response.Write "<h1>You are " & Request.QueryString("age") & " years old</h1>"

 %>

 </body>
 </html>
Lesson 11: Passing variables with forms
Interactive websites require input from users. One of the most common ways to get input are with forms.In this lesson, we will look at how to build forms and process inputs on the server.
<form>
When you code a form, there are two particular important attributes: action and method.- action
- Is used to enter the URL where the form is submitted. It this case it would be the ASP file that you want to handle the input.
- method
- Can either have the value "post" or "get" which are two different methods to pass data. At this point, you don't need to know much about the difference, but with "get", the data is sent through the URL, and with "post", data is sent as a block of data through standard input service (STDIN).
An HTML page with a form
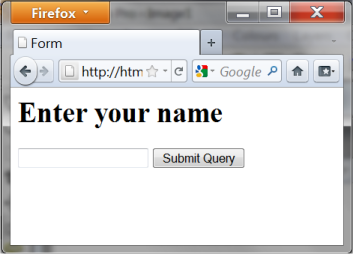
The page that contains the form doesn't need to be an ASP file (but it can be). It need not even be on the same site as the file that will receive the data.In our first example, we will look at a very simple form with one text field:
<html>
 <head>
 <title>Form</title>
 </head>
 <body>

 <h1>Enter your name</h1>

 <form method="post" action="handler.asp">
 <input type="text" name="username">
 <input type="submit">
 </form>

 </body>
 </html>
Requesting form data with ASP
When you need to request data from a form - and many other places (we will come back to that) - you use the object request. Since our data was submitted through a form using the method "post", we write:Request.Form("fieldname")
First create a page with a form as above. Then make an ASP page named "handler.asp" (notice that this is the name of the page we wrote in the action attribute in our <form>).
The file "handler.asp" shall have the following content:
<html>
 <head>
 <title>Form</title>
 </head>

 <body>
 <%
 Response.Write "<h1>Hello " & Request.Form("username") & "</h1>"

 %>
 </body>

 </html>
User input and conditions
In the next example, we will try to use user input to create conditions. First, we need a form:<html> <head> <title>Form</title> </head> <body> <form method="post" action="handler.asp"> <p>What is your name:</p> <input type="text" name="username"></p> <p>What is your favorite color: <input type="radio" name="favoritecolor" value="r" /> Red <input type="radio" name="favoritecolor" value="g" /> Green <input type="radio" name="favoritecolor" value="b" /> Blue </p> <input type="submit" value="Submit" /> </form> </body> </html>
<%
 strHeading = "<h1>Hello " & Request.Form("username") & "</h1>"

 Select Case Request.Form ("favoritecolor")
 Case "r"
  strBackgroundColor = "rgb(255,0,0)"
 Case "g"
  strBackgroundColor = "rgb(0255.0)"

 Case "b"
  strBackgroundColor = "rgb(0,0,255)"

 Case Else
  strBackgroundColor = "rgb(255,255,255)"
 End Select
 %>

 <html>
 <head>
 <title>Form</title>

 </head>
 <body style="background: <% = strBackgroundColor %>;">

 <% Response.Write strHeading %>

 </body>
 </html>
But what if the user does not fill out his name? Then it only says "Hello" in the title. We will use an extra condition to change that.
<%
 strUserName = Request.Form ("username")

 If strUserName <>"" Then

     strHeading = "<h1>Hello " & strUserName & "</h1>"

 Else
     strHeading = "<h1>Hello stranger!</h1>"

 End If


 Select Case Request.Form ("favoritecolor")

 Case "r"
  strBackgroundColor = "rgb(255,0,0)"
 Case "g"
  strBackgroundColor = "rgb(0255.0)"
 Case "b"

  strBackgroundColor = "rgb(0,0,255)"
 Case Else
  strBackgroundColor = "rgb(255,255,255)"
 End Select
 %>

 <html>

 <head>

 <title>Form</title>
 </head>
 <body style="background: <% = strBackgroundColor %>;">

 <% Response.Write strHeading %>

 </body>
 </html>
Lesson 12: Sessions
When you visit a website, you do a number of different things. You click from one page to another. Perhaps you also fill out a form or purchase a product.As a web developer, such information is of great importance to developing successful web solutions.
Suppose, for example, that you want to make a site where some pages are protected with login and password. To make this protection effective, the password-protected pages should have access to information on whether the user has logged in at an earlier time. You must, in other words, be able to "remember" what the user did earlier.
This is exactly what this lesson is about - how you can use Sessions in ASP to store and retrieve information during a user's visit to your site.
Session object
TheA session can begin in different ways. We will not go into technical details here but focus on the case where a session starts by a value is being stored in the Session object. A session ends/dies if the user hasn't requested any pages within in a certain timeframe (by the standard 20 minutes). Of course, you can also always end/kill a session in your script.
Let us say, 50 people are clicking around on the same site, eg. a web shop, at the same time. Information on what they each of them have in their shopping cart would best be stored in the Session object. In order to identify the individual users the server uses a unique user ID that is stored in a cookie. A cookie is a small text file stored on the user's computer - more about cookies in lesson 13. Therefore, sessions often require support of cookies in the user's browser.
An example of using sessions
When you requested this page, I stored the current time in a session. I did this so that I can now show you an example of how a session works.I named the item "StartTime" and stored it by adding the following line in my ASP script:
<%
 Session ("StartTime") = Now
 %>
Your session has the following ID: 27e89b51b0b051a93bdbc0bc699818c4
At any time, I can call the "StartTime" from the session by writing:
<%
 Response.Write Session("StartTime")
 %>
But what is interesting is that the information remains in the Session object, even after you have left this page. The information will follow you until your session ends.
By default, a session lasts for 20 minutes, then it dies automatically. But if you want a session to last longer or shorter, you can define the desired time in minutes this way:
<%
 Session.Timeout = 60
 %>
If you want to stop a session, it can always be killed in this way:
<%

 Session.Abandon
 %>
Login system with sessions
In the following example, we will make a very simple login system. We will use many of the things they have learned in previous lessons.The first thing we need is a form where people can enter their username and password. It could look like this:
<html>
 <head>
 <title>Login</title>

 </head>
 <body>
 <form method="post" action="login.asp">

 <p>Username: <input type="text" name="username" /></p>
 <p>Password: <input type="text" name="password" /></p>

 <p><input type="submit" value="Let me in" /></p>

 </form>
 </body>
 </html>
In this file, we check whether it is the correct username and password that has been entered. If that is the case, we set a session that says that this user is logged in with the correct username and password.
<html>

 <head>
 <title>Login</title>

 </head>
 <body>
 <%
 ' Check if username and password are correct
 If Request.Form("username") = "asp" AND Request.Form("password") = "asp" Then

 ' If correct, we set the session to YES
   Session("login") = "YES"
   Session.Timeout = 30
   Response.Write "<h1> You are now logged in</h1>"

   Response.Write "<p><a href='document.asp'>Link to protected file</a> </p>"

 Else

 'If not correct, we set the session to NO

   Session("login") = "NO"
   Session.Timeout = 30
   Response.Write "<h1>You are NOT logged in</h1>"

   Response.Write "<p> <a href='document.asp'>Link to protected file</a></p>"

 End If
 %>

 </body>
 </html>
<%
 ' If the user is not logged in
 ' send him/her to the login form

 If Session ("login") <>"YES" Then

   Response.Redirect "form.asp"
 End If
 %>

 <html>
 <head>
 <title>Login</title>
 </head>

 <body>
 <h1>This document is protected</h1>

 <p>You can only see it if you are logged in.</p>
 </body>
 </html>
Lesson 13: Cookies
How and what kind of information websites are collecting from their users, and especially how they use it, is a hot topic. Often cookies are mentioned as an example of how information is collected and pose a threat to your privacy. But are there reasons to be worried? Judge for yourself. Once you have gone through this lesson, you will know what can be done with cookies.What is a cookie?
A cookie is a small text file in which a website can store different information. Cookies are saved on the user's hard drive and not on the server.Most cookies expire (delete themselves) after a predetermined time period, which can range from one minute to several years. But the user can also identify and delete any cookies on his/her computer.
Most browsers - such as Microsoft Internet Explorer, Mozilla Firefox and Google Chrome - can be configured to let the user choose whether or not he/she will accept a cookie. But then, why not just say no to all cookies? It is possible. But many websites would not work as intended without cookies, since cookies in many contexts are used to improve the usability and functionality of the website.
How is information stored in a cookie?
It easy to set or modify a cookie in ASP withFirst, you need a name for the cookie. In this example we will use the name "HTMLTest". Next, you set the value of the cookie like this:
<%
 ' Setting the cookie
 Response.Cookies("HTMLTest")("Name") = "C. Wing"
 Response.Cookies("HTMLTest")("interest") = "planespotting"


 ' How long the cookie should last - in this case one year
 Response.Cookies("HTMLTest").Expires = Date+365

 %>
How do you retrieve the value of a cookie?
To get the value of the cookie,<% ' Retrieve values from the cookie strName = Request.Cookies("HTMLTest")("Name") strInterest = Request.Cookies("HTMLTest")("interest") ' Write to the client Response.Write "<p>" & strName & "</p>" Response.Write "<p> Your interest is " & strInterest & "</p>" %>
Who can read the cookie?
By default, a cookie can be read at the same second-level domain (eg. html.net) as it was created. But by using the attributes domain and path, you can put further restrictions on the cookie.<% ' Setting the cookie Response.Cookies ("HTMLTst")("Name") = "C Wing" Response.Cookies ("HTMLTest")("interest") = "planespotting" ' How long the cookie should last - in this case one year Response.Cookies ("HTMLTest").Expires = Date+365 ' The cookie should only be read by fr.html.dk Response.Cookies("HTMLTest").Domain = "fr.html.dk" ' The cookie can only be read by pages in this folder Response.Cookies("HTMLTest").Path = "/tutorials/asp" %>
Example of a cookie
We can try to save a sample cookie on your computer and then see how it looks.The following code sets the cookie:
<%
 ' Setting the cookie
 Response.Cookies ("HTMLTest")("text") = "This text is in a cookie!"

 ' The cookie should live for 24 hours
 Response.Cookies ("HTMLTest").Expires = Date+1


 ' The cookie should only be read by www.html.net

 Response.Cookies("HTMLTest").Domain = "www.html.net"

 ' The cookie can only be read by pages in this folder
 Response.Cookies ("HTMLTest").Path = "/tutorials/asp"

 ' Write the information to the client
 strText = Request.Cookies("HTMLTest")("text")
 Response.Write "<p> & strText & "</p>"


 %>
HTMLTest TEXT=This+text+is+in+a+cookie% 21 www.html.net/tutorials/asp 0 80973619229399148 4216577264 29399141 *
We will not go into detail with the different codes, but simply note that the user has full control over cookies on his/her computer.In this lesson we have looked at what cookies can do but not what they can be used for. It's a common concern that some sites use cookies for inappropriate activities. But in most cases, cookies are used to make sites more user-friendly or relevant for the individual users.
If you choose to use cookies on your site it might be a good idea to tell your users that your site uses cookies. This can, for example, be communicated in a privacy policy or registration process.
Lesson 14: The File System Object
With theFor example, you can use the {0}{1/}FileSystemObject{/0} to read or write a text file. Or you can list all files in a specified folder. There are many possibilities and the FileSystemObject can save you lots of tedious work.
Here, we'll look at how you can use the FileSystemObject to work with drives, folders and files. The goal is to give you a quick overview. In the next lessons, we will look more closely at the different possibilities with the FileSystemObject.
Drives
We start by looking at the computer's drives. Not because this is what you will be using the most, but because it's sensible to start with drives before digging into the topic of folders and files.In the example below, we get all the drives on the server listed. This is done by the FileSystemObject, which creates an array with the drives. Each drive letter is then written as we run through the array.
<html>

 <head>
 <title>FileSystemObject</title>
 </head>
 <body>
 <%
 ' Variables

 Dim FSO, d, dc

 ' FileSystemObject
 Set fso = CreateObject("Scripting.FileSystemObject")

 ' Array of drives
 Set dc = fso.Drives

 ' Loop through the array and write the drive letter
 For Each d in dc
    Response.Write d.DriveLetter & "<br />"

 Next
 %>

 </body>
 </html>
<html>

 <head>
 <title>FileSystemObject</title>
 </head>
 <body>
 <%

 ' Variables
 Dim fso, d, t

 ' FileSystemObject
 Set fso = CreateObject("Scripting.FileSystemObject")

 ' Object Drive
 Set d = fso.GetDrive("E:")

 ' Find drive type and set description

 Select Case d.DriveType
    Case 0: t = "Unknown"
    Case 1: t = "Removable"
    Case 2: t = "Fixed"

    Case 3: t = "Network"
    Case 4: t = "CD-ROM"

    Case 5: t = "RAM Disk"
 End Select
 Response.Write "Drive" & dDriveLetter & ": is a " & t & " drive"

 %>
 </body>

 </html>
Folders
The FileSystemObject also allows you to work with folders on the server. But before we begin to look at theThe problem is that your website normally is hosted on a web-hosting server. Therefore, you probably don't know the physical location of a folder or a file. But help is near: You can use the method
For example, to find the physical location of the folder we are in right now, we write:
<%
 Response.Write Server.Mappath("/tutorials/asp/")
 %>
d:\www2\html\tutorials\asp
Let's now use this method together with the FileSystemObject and the FolderObject. We will not go through all the different possibilities - only a few selected. Again, see the documentation for a complete listing.
- DateCreated
- Returns the date and time when a file or folder was created.
- DateLastModified
- Returns the date and time when a file or folder was edited/modified.
- Size
- Returns the size of a file or a folder (including all files and subfolders) in bytes.
<html>
 <head>
 <title>FileSystemObject</title>
 </head>
 <body>
 <%

 ' Variables

 Dim fso, f, folderspec

 ' Find the physical location of the folder
 folderspec = Server.Mappath ("/tutorials/asp/")

 ' FileSystemObject
 Set fso = CreateObject("Scripting.FileSystemObject")

 ' Folder object

 Set f = fso.GetFolder(folderspec)

 ' Find and write properties
 Response.Write "<h1>Folder: " & folderspec & "</h1>"

 Response.Write "<p>Was created: " & f.DateCreated & "</p>"

 Response.Write "<p>Last edited: " & f.DateLastModified & "</p>"

 Response.Write "<p>Size: " & f.Size & " bytes</p>"
 %>
 </body>

 </html>
Files
Just as with folders, you can use the FileSystem object to find the properties of a file.In exactly the same way as above, we can find the same properties for the file you are looking at now: http://www.html.net/tutorials/asp/lesson14.asp.
<html>
 <head>
 <title>File System object</title>
 </head>
 <body>
 <%
 ' Variables

 Dim fso, f, filespec

 ' Find the physical location of the file
 filespec = Server.Mappath("/tutorials/asp/lesson4.asp")

 ' FileSystemObject
 Set fso = CreateObject("Scripting.FileSystemObject")

 ' File object
 Set f = fso.GetFiles(filespec)

 Find and write properties

 Response.Write "<h1>The file: " & filespec & "</h1>"

 Response.Write "<p>Was created: " & f.DateCreated & "</p>"
 Response.Write "<p>Last edited: " & f.DateLastModified & "</p>"

 Response.Write "<p>Size: " & f.Size & " bytes</p>"
 %>
 </body>

 </html>
Lesson 15: Reading from a text file
In the previous lesson, we learned how to use theText files can be extremely useful for storing various kinds of data. They are not quite as flexible as real databases, but text file typically don't require as much memory. Moreover, text files are a plain and simple format that works on most systems.
Open the text file
We use theObject.OpenTextFile(filename, mode)
- filename
- Name of the file to be opened.
- Mode
- Mode can set to 1 (ForReading), 2 (ForWriting) or 8 (ForAppending). In this lesson we will only read from a file and, therefore, use ForReading. In the next lesson, we will learn to write to a file.
First, let's try to open unitednations.txt:
<%
 ' Variables
 Dim fso, f filespec

 ' FileSystemObject
 Set fso = CreateObject("Scripting.FileSystemObject")

 ' Find the physical location of the text file
 filespec = Server.Mappath("/tutorials/asp/unitednations.txt")

 ' Open the text file
 Set f = fso.OpenTextFile(filespec,1)


 ' Close the text file
 f.Close
 %>
Example 1: Read a line from the text file
With the method<html> <head> <title>Reading from text files</title> </head> <body> <% Dim fso, f, filespec Set fso = CreateObject("Scripting.FileSystemObject") filespec = Server.Mappath("/tutorials/asp/unitednations.txt") Set f = fso.OpenTextFile(filespec,1) ' Read line from the text file and write the contents to the client Response.write f.readline f.Close %> </body> </html>
Example 2: Read all lines from the text file
<html>

 <head>
 <title>Reading from text files</title>
 </head>
 <body>
 <%
 Dim fso, f, filespec

 Set fso = CreateObject("Scripting.FileSystemObject")
 filespec = Server.Mappath("/tutorials/asp/unitednations.txt")

 Set f = fso.OpenTextFile (filespec,1)

 ' Read line by line until end of file

 Do While Not f.AtEndOfStream
    Response.write f.ReadLine & "<br />"
 Loop

 f.Close

 %>

 </body>
 </html>
Example 3: Skip lines
You don't need to read all lines in a file. With the methodThis is shown in the example below, where the first 5 lines in the file are skipped and whereafter the sixth line is read:
<html>
 <head>
 <title>Reading from text files</title>

 </head>
 <body>
 <%
 Dim fso, f, filespec

 Set fso = CreateObject("Scripting.FileSystemObject")
 filespec = Server.Mappath("/tutorials/asp/unitednations.txt")
 Set f = fso.OpenTextFile(filespec,1)

 ' Skip the first five lines

 For intLine = 1 to 5
    f.SkipLine
 Next

 ' Write the sixth line
 Response.write f.readline & "<br />"


 f.Close

 %>
 </body>
 </html>
Example 4: A simple link directory
As mentioned at the beginning of this lesson, text files can be an excellent data storage. This is illustrated in the next example where we create a simple link directory from the contents of the text file unitednations.txt.The file is systematically written with the name of the program, then a comma, and then the domain. As you can probably imagine, more information could easily be stored in this comma-separated data file.
To get the information in each line, we use an array. See Lesson 8 for more information on arrays.
<html>
 <head>
 <title>Reading from text files</title>

 </head>
 <body>
 <%
 Dim fso, f, filespec

 Set fso = CreateObject("Scripting.FileSystemObject")
 filespec = Server.Mappath("/tutorials/asp/unitednations.txt")
 Set f = fso.OpenTextFile(filespec,1)

 ' Read line by line until end of file

 Do While Not f.AtEndOfStream

 ' Make array using comma as delimiter
    arrM = Split(f.readline ,",")

 ' Write links - get the data in the array

    Response.write "<li><a href='http://" & arrM(1) & "'>" & arrM(0) & "</a></li>"

 Loop


 f.Close
 %>
 </body>
 </html>
Lesson 16: Writing to a text file
In the previous lesson, we learned to read from a text file. In this lesson, we will learn to write to a text file.The two methods are very similar, but there is one very important difference: You must have write permissions to the file. This means that the file will have to be located in a folder where you have the necessary permissions.
With most web hosts, you will normally have one folder with write permissions. It's often called something like "cgi-bin", "log", "databases" or something similar. Read more on your web host's support pages. If you work locally on your own computer, you can set the permissions yourself: right-click on the folder and choose "Properties".
Note that it is the text file that needs to be in the folder with write permissions - not the ASP file.
Open the text file for writing
In the same way as when reading from a text file, theThe difference between ForWriting and ForAppending is where the 'cursor' is located - either at the beginning or at the end of the text file.
In the examples in this lesson we use an empty text file called textfile.txt - but you can, of course, make your own text file if you like.
First, let us try to open the text file for writing:
<%
 ' Variables
 Dim fso, f, filespec

 ' FileSystemObject

 Set fso = CreateObject("Scripting.FileSystemObject")

 ' Find the physical location of the text file
 filespec = Server.Mappath("/tutorials/asp/textfile.txt")

 ' Open the text file
 Set f = fso.OpenTextFile(filespec,2)

 'Close the text file
 f.Close

 %>
Example 1: Write a line to the text file
To write a line we must use the method<html> <head> <title>Reading from text files</title> </head> <body> <% Dim fso, f, filespec Set fso = CreateObject("Scripting.FileSystemObject") filespec = Server.Mappath("/tutorials/asp/textfile.txt") Set f = fso.OpenTextFile(filespec,2) ' Write a text line f.WriteLine "VBScript and ASP is fun!" 'Open file for reading, and read the line Set f = fso.OpenTextFile(filespec,1) Response.write f.ReadLine f.Close %> </body> </html>
Example 2: Adding a text block to a text file
Of course, it is also possible to add an entire text block, instead of just a single line. This is done with the method<html> <head> <title>Reading from text files</title> </head> <body> <% Dim fso, f, filespec Set fso = CreateObject("Scripting.FileSystemObject") filespec = Server.Mappath("/tutorials/asp/tekstfil.txt") Set f = fso.OpenTextFile(filespec,2) ' Write text line f.Write Request.Form("TextBlock") ' Open file for reading and read line by line Set f = fso.OpenTextFile(filespec,1) Do While Not f.AtEndOfStream Response.write f.ReadLine & "<br />" Loop f.Close %> </body> </html>
Lesson 17: Databases
There are many different databases: MS Access, MS SQL Server, Oracle SQL Server, MySQL and many others. In this tutorial, we will use the Microsoft Access database. Access is the natural place to start when you want to use databases in ASP.In this lesson, we will start by looking at the Access database that we will use in the next lessons. Access is part of the Microsoft Office family and is included in some of the Office suites. You need to have Microsoft Access installed on your computer in order to go through this lesson and the next lessons. A trial version can be downloaded at http://office.microsoft.com.
Below you can download the database used in the examples in this tutorial. In the examples, Access 2010 is used but there are no significant differences in the screens that appear.
About Microsoft Access
Once you've downloaded and opened the database, you will see a screen with a list of the tables in the database. We will only use one table in the database. The table is named "people" and contains names and birth dates. The table opens by default in Datasheet View. If you are used to working with spreadsheets, or maybe has used Access before, the table view will look familiar to you with columns and rows:
There are primarily two different ways of viewing a table in Access: Design View and Datasheet View. Above, you see the table in Datasheet view, meaning that you see the table with all the values. In the upper left corner of the program you can switch between the two view types:
Lesson 18: Database Connections
To access a database, you need a database connection.In this lesson, we'll look at how you can create a database connection. There are several options, but the simplest is a so-called DSN-less connection, which means a connection where you do not have to set up a Data Source Name (DSN) on the server, but create a shortcut to the database directly in your code instead.
If you have your own website, you should read about database connections on your host's support pages. Web hosts may have special rules for how to make your database connections.
In which folder should the database be stored?
The database can be placed in any folder. But if you want to add data to the database, it is important to have write permissions.Again, you should consult your host's support pages for more information. Usually, you will have one folder with write permissions, which are often called "cgi-bin", "log", "databases" or something similar. Conditions vary from host to host, so it is not possible to give a more precise answer. If you work locally on your own computer, you can set the permissions yourself: right-click on the folder and choose "Properties".
How to make a DSN-less connection?
To create a DSN-less connection, you must specify the physical location of the database on the server. If you have your own server, you can find the location in Windows Explorer (or similar), but if you have a hosted website, you can use the methodServer.MapPath("/cgi-bin/database.mdb")
<%
 ' ADODB connection object

 Set Conn = Server.CreateObject("ADODB.Connection")
 ' Remember to specify the correct path to your database
 DSN = "DRIVER = {Microsoft Access Driver (*. mdb)}; DBQ =" & Server.MapPath("/cgi-bin/database.mdb")

 'Open database connection
 Conn.Open DSN
 %>
By the way, keep in mind that it is good practice to close the database connection again when you're finished retrieving or inserting data. This is done with the following code:
<%
 ' Close the database connection
 Conn.Close
 Set Conn = Nothing
 %>
Lesson 19: Get data from database
In the previous lessons, we have learned to create a database in Access and to make a database connection. Now it is time to retrieve content from the database to our ASP pages.This is really one of the most important lessons in this tutorial. Once you have read and understood this lesson, you will realize why database-driven web solutions are so powerful, and your views on web development will be expanded dramatically.
SQL queries
To retrieve data from a database, you use queries. An example of a query could be: "get all data from the table 'people' sorted alphabetically" or "get names from the table 'people'."To write such queries, you use the language Structured Query Language (SQL).
Fortunately, SQL is very easy to learn. Try looking at this simple example:
Get all data from the table 'people'
SELECT * FROM people
Example 1: Retrieve data from a table
This example uses the database from lesson 17 and the database connection from lesson 18. Therefore, it is important that you read these lessons first.The example shows how data in the table "people" is retrieved with a SQL query.
The SQL query returns a result in the form of a series of records. These records are stored in a so-called recordset. A recordset can be described as a kind of table in the server's memory, containing rows of data (records), and each record is subdivided into individual fields (or columns).
A recordset can be compared to a table, as you know it from the Datasheet View in Access:
The code below shows how to use a recordset:
<html>
 <head>
 <title>Retrieve data from database </title>
 </head>
 <body>

 <%
 ' Database connection - remember to specify the path to your database

 Set Conn = Server.CreateObject("ADODB.Connection")
 DSN = "DRIVER = {Microsoft Access Driver (*. mdb)}; "
 DSN = DSN & "DBQ=" & Server.MapPath ("/cgi-bin/database.mdb")

 Conn.Open DSN

 ' SQL Query
 strSQL = "SELECT * FROM people"
 ' Execute the query (the recordset rs contains the result)
 Set rs = Conn.Execute(strSQL)

 ' Loop the recordset rs
 Do

    ' Write the value of the column FirstName

    Response.Write rs("FirstName") & "<br />"

    ' Move to next record in rs
    rs.MoveNext

 ' Continue until end of recordset (EOF = End Of File)

 Loop While Not rs.EOF

 ' Close the database connection
 Conn.Close
 Set Conn = Nothing
 %>
 </body>
 </html>
The order of the recordset is exactly the same as in the table in the database. But in the next example, it will be shown how to sort recordset.
Example 2: Sort the data alphabetically, chronologically or numerically
Often it can be helpful if a list or table of data is presented alphabetically, chronologically or numerically. Such sorting is very easy to do with SQL, where the syntax Order By ColumnName is used to sort according to the column contents.Look at the SQL statement from the example above:
strSQL = "SELECT * FROM people"
strSQL = "SELECT * FROM people ORDER BY FirstName"
strSQL = "SELECT * FROM people ORDER BY BirthDate"
strSQL = "SELECT * FROM people ORDER BY BirthDate DESC"
<html>
 <head>

 <title>Retrieve data from database </title>

 </head>
 <body>
 <%
 ' Database connection - remember to specify path to your database
 Set Conn = Server.CreateObject("ADODB.Connection")
 DSN = "DRIVER={Microsoft Access Driver (*. mdb)}; "

 DSN = DSN & "DBQ=" & Server.MapPath("/cgi-bin/database.mdb")

 Conn.Open DSN

 ' SQL Query

 strSQL = "SELECT * FROM people ORDER BY BirthDate DESC"
 ' Execute the query (the recordset rs contains the result)
 Set rs = Conn.Execute (strSQL)

 ' Loop the recordset (rs)
 Do

    ' Write the contents of the columns FirstName and BirthDate

    Response.Write rs("FirstName") & " " & rs("BirthDate") & "<br />"

    ' Move to the next record in rs

    rs.MoveNext

 ' Continue until end of recordset (EOF = End Of File)
 Loop While Not rs.EOF

 ' Close the database connection
 Conn.Close

 Set Conn = Nothing
 %>

 </body>
 </html>
Retrieve selected data
Until now, our SQL statement retrieves all rows from the table. But often you need to set criteria in the SQL query for the data to be retrieved. For example, if we only want the rows for those who had a particular phone number or a certain last name.Say, we only want to retrieve people from the database who hav the phone number "66554433". That could be done like this:
strSQL = "SELECT * FROM people WHERE Phone = '66554433 '"
= Equals
< Less
> Greater Than
<= Less than or equal to
> = Greater than or equal to
<> Not equal to
In addition, there are some logical operators:
AND
OR
NOT
See lesson 6 for more information on how to set up conditions.
In the next example, we use conditions to set up a address book.
Example 3: Address book
In this example we will try to combine many of the things you have just learned. We will make a list of the names from the database where each name is a link to further details about the person.For this, we need two files - liste.asp and people.asp - with the following code:
The code of list.asp
<html>
 <head>
 <title>Retrieve data from the database</title>
 </head>
 <body>

 <ul>
 <%

 ' Database connection - remember to specify path to your database
 Set Conn = Server.CreateObject("ADODB.Connection")
 DSN = "DRIVER={Microsoft Access Driver (*. mdb)}; "
 DSN = DSN & "DBQ=" & Server.MapPath("/cgi-bin/database.mdb")

 Conn.Open DSN

 strSQL = "SELECT * FROM people ORDER BY FirstName DESC"
 Set rs = Conn.Execute (strSQL)

 Do
    ' Name of the person

    strNavn = rs("FirstName") & " " & rs("LastName")

    ' Create a link to person.asp with the Id-value in the URL

    strLink = "<a href = 'person.asp?id = " & rs("Id") & "'>" & strNavn & "</a>"

     'List link
    Response.Write "<li>" & strLink & "</li>"

    rs.MoveNext

 Loop While Not rs.EOF

 Conn.Close
 Set Conn = Nothing
 %>
 </ul>
 </body>
 </html>
The code for person.asp
<html>
 <head>
 <title>Retrieve data from database</title>
 </head>
 <body>

 <dl>
 <%
 ' Database connection - remember to specify the path to your database
 Set Conn = Server.CreateObject("ADODB.Connection")
 DSN = "DRIVER={Microsoft Access Driver (*. mdb)}; "
 DSN = DSN & "DBQ=" & Server.MapPath("/cgi-bin/database.mdb")

 Conn.Open DSN

 ' Get data from the database depending on the value of the id in the URL
 strSQL = "SELECT * FROM people WHERE Id =" & Request.QueryString("id")
 Set rs = Conn.Execute(strSQL)

 ' Write the data of the person
 Response.Write "<dt>Name:</dt><dd>" & rs("FirstName") & " " & rs("LastName") & "</dd>"

 Response.Write "<dt>Phone:</dt><dd>" & rs("Phone") & "</dd>"
 Response.Write "<dt>Birthdate:</dt><dd>" & FormatDateTime(rs("BirthDate"), vbLongDate) & "</dd>"

 Conn.Close
 Set Conn = Nothing
 %>
 </dl>
 <p><a href="list.asp">Return to list</a></p>

 </body>

 </html>
Imagine that the database had contained 10,000 products with detailed descriptions. By making a few changes in the above files, you could easily create a product catalogue with more than 10,000 pages with only one database and two ASP files.
Lesson 20: Insert data into a database
When you have to insert new data in your Access database, you could download the entire database, manually entering data and then uploading the entire database again. But there is an easier way. In this lesson, we look at how you can insert data into the database directly from your ASP scripts.Insert data using SQL
You retrieve data from a database in the same way that you use SQL queries to insert data into the database. The syntax of the SQL statement is:
INSERT INTO TableName(column1, column2, ...) VALUES(value1, value2, ...)
As you can see, you can update multiple columns in the SQL statement by specifying them in a comma-separated list. But of course, it is also possible to specify just one column and one value. The columns that are not mentioned in the SQL statement will just be empty.Example: Insert a new person in the table
Again, we use the database from lesson 17 . Let's say we want to update the database with an additional person. It could be the person Gus Goose with the phone number 99887766 and 20-04-1964 as the date of birth.The SQL statement would then look like this:
strSQL = "INSERT INTO person(FirstName,LastName,Phone,BirthDate) VALUES('Cousin','Gus','99887766 ','20-04-1964')"
Conn.Execute(strSQL)
As you can see, SQL statements can get quit long, and you can easily lose track. Therefore, it can be an advantage to write the SQL statement in a slightly different way:Conn.Execute(strSQL)
strSQL = "INSERT INTO people ("

 strSQL = strSQL & "FirstName, "
 strSQL = strSQL & "LastName, "
 strSQL = strSQL & "Telephone, "
 strSQL = strSQL & "birth) "

 strSQL = strSQL & "VALUES ("

 strSQL = strSQL & "'cousin', "
 strSQL = strSQL & "'Gus', "
 strSQL = strSQL & "'99887766', "

 strSQL = strSQL & "'20-04-1964')"

 Conn.Execute(strSQL)
In practice, it makes no difference which method you choose, but once you start working with larger tables, it's crucial that you always keep track.
Try running the following code to insert Gus Goose into the database:
<html>
 <head>
 <title>Enter data into database</title>
 </head>
 <body>
 <%

 ' Database connection - remember to specify path to your database

 Set Conn = Server.CreateObject("ADODB.Connection")
 DSN = "DRIVER = {Microsoft Access Driver (*. mdb)}; "
 DSN = DSN & "DBQ=" & Server.MapPath("/cgi-bin/database.mdb")

 Conn.Open DSN

 ' The SQL statement is built

 strSQL = "INSERT INTO people ("

 strSQL = strSQL & "FirstName, "
 strSQL = strSQL & "LastName, "

 strSQL = strSQL & "Phone, "
 strSQL = strSQL & "BirthDate) "

 strSQL = strSQL & "VALUES("

 strSQL = strSQL & "'Cousin', "

 strSQL = strSQL & "'Gus', "
 strSQL = strSQL & "'99887766', "

 strSQL = strSQL & "'20-04-1964')"

 ' The SQL statement is executed
 Conn.Execute (strSQL)

 ' Close the database connection
 Conn.Close
 Set Conn = Nothing
 %>

 <h1>The database is updated!</h1>
 </body>
 </html>
Save user input into a database
Often you want to save user input in a database.As you've probably already figured out, this can be done by creating a form as described in lesson 11 - where the values from the form fields can be inserted in the SQL statement. Suppose you have a simple form like this:
<form action="insert.asp" method="post">
 <input type="text" name="FirstName" />
 <input type="submit" value="Save" />

 </form>
strSQL = "INSERT INTO people (FirstName) values('" & Request.Form ("FirstName") & "')"
Most common beginner mistakes
In the beginning, you will probably get a lot of error messages when you try to update your databases. There is no room for the slightest inaccuracy when you work databases. A misplaced comma can mean the database is not being updated, and you get an error message instead. Below, we describe the most common beginner mistakes.The field doesn't allow zero length
In Design View (see screenshot below), you can set the parameter "Allow Zero Length" for each column. If this parameter is set to "No", and you attempted to insert a null value in this column, it would not be possible to insert the record in the database.Wrong data types
It is important that there is consistency between the type of data and column. Each column can be set to a data type. The screenshot below shows the data types for table "people" in our example.Below is the most common data types listed:
| Setting | Data Type | Size |
|---|---|---|
| Text | (Default) Text or combinations of text and numbers. Can also be used for numbers that are not used in calculations (e.g. phone numbers). | Up to 255 characters - or the length defined in the "Field Size" |
| Memo | Longer pieces of text, or combinations of text and numbers. | Up to 65.535 characters. |
| Number | Numerical data for mathematical calculations. | 1, 2, 4, or 8 bytes. |
| Date/Time | Dates and times. | 8 bytes. |
| Currency | Currency values. | 8 bytes. |
| AutoNumber | A unique number (incrementing by 1) inserted by Microsoft Access whenever a new record is added to the database. AutoNumber fields cannot be updated. | 4 bytes |
| Yes/No | Fields that can contain only one of two values, such as Yes/No, True/False, On/Off. | 1 bits. |
| OLE Object | An object (e.g. a Microsoft Excel spreadsheet, a Microsoft Word document, graphics, audio, or other binary data). | Up to 1 gigabyte (limited by the available disk space) |
SQL statements with single quotes ( ' )
If you allow users to type some text in a form, and this text contains the character ' (single quote), the record cannot be inserted into the database. The solution is to replace a single quote (') with double quote ('').This can be done with the function
<%
 strTekst = Request.Form ("TextField")

 strTekst = Replace(strTekst, "'", "''")
 %>
Lesson 21: Delete data from database
In the two previous lessons, you have learned to retrieve and insert data into a database. In this lesson, we'll look at how to delete records in the database, which is considerably easier than inserting data.Delete data using SQL
The syntax for an SQL statement that deletes records is:
DELETE FROM TableName WHERE condition
Example 1: Delete a record
When deleting a record, you can use the unique AutoNumber field in the database. In our database, it is the column named Id. Using this unique identifier ensures that you only delete one record. In the next example, we delete the record where Id has the value 24:<html> <head> <title>Delete data in the database</title> </head> <body> <% ' Database connection - remember to specify the path to your database Set Conn = Server.CreateObject("ADODB.Connection") DSN = "DRIVER={Microsoft Access Driver (*. mdb)}; " DSN = DSN & "DBQ=" & Server.MapPath("/cgi-bin/database.mdb") Conn.Open DSN ' The SQL statement that deletes the record strSQL = "DELETE FROM people WHERE Id = 24" Conn.Execute(strSQL) ' Close the database connection Conn.Close Set Conn = Nothing %> <h1>Record is deleted!</h1> </body> </html>