Lesson 13: JavaScript Objects - Arrays
Just using a few properties and methods of common JavaScript objects has opened your eyes to the amazing things that Object Oriented Programming enables you to accomplish with a few lines of code. In this lesson, you will learn to use what is a very powerful object in most programming languages, including JavaScript of course: the Array object.
In particular, in this lesson you will learn:
- what the Array object is for;
- how to create arrays;
- how to access, sort, add, and remove data inside an array.
In the process, you will learn how to use the for ... in loop to access data inside an array.
What is the Array object for?
An object's job is that of storing and allowing for the easy manipulation of data. We can safely say that the Array object performs both tasks wonderfully.
From the perspective of data storage, an array works a bit like a variable. The difference is that you are not limited to one piece of data, as it's the case with common variables. You can stuff several items at once inside an array and retrieve whichever you need at the right time in your program.
Imagine if you had to have a storage place for each pair of socks. This would be a nightmare! Having a drawer to store all your socks in one place makes much more sense. In this respect, arrays are a bit like drawers, but much more powerful.
From the point of view of data manipulation, the Array object offers a wealth of properties and methods, some of which you will examine in this lesson.
How do you create an Array object?
You create an array in 1 of 3 ways:
1) use new Array()
This is the most verbose approach. It works as follows:
  var colors = new Array();

  colors[0] = "green";

  colors[1] = "red";
2) use new Array(item0, item1, item2 ...)
This approach also employs the new Array() constructor, but does so using a more concise formulation. Here's what it looks like:
var colors = new Array("green", "red");
3) use the literal array approach
This is the shortest way of creating and populating an array, and it's the most widely used approach. It looks like this:
var colors = ["green", "red"];
All 3 approaches illustrated above, create an array object called colors containing 2 string values, "green" and "red" - but arrays can store all other data types: numbers, booleans, even other arrays! The items in our array occupy position 0 and 1 respectively.
As you might have guessed, you count the index position of an item inside an array starting at 0.
But, is this index position important? Well, yes it is, at least if you want to use the items inside the array, which is most likely the case.
Here's what I mean.
How do I access data inside the Array object?
Arrays are great to store several values using only 1 variable. However, they wouldn't be so great if you couldn't also access those values quickly and easily. Here's how it's done:
  //"green" is at index position 0, "red" is at index position 1, etc.

  var colors = ["green", "red", "yellow", "orange", "blue"];

  var red = colors[1];

  document.write(red);
Enter the code snippet above between enclosing <script> tags in an HTML page, save your work, and run the page in the browser. You should see the word red displayed on the page.
What you did was to access the second value in the colors array by using its index position within the array starting to count at 0.
Access all items in the array with a loop
You might have probably guessed this, but loops and arrays go together like cookies and milk. Here's how you would access all values inside an array by looping over each of them:
  //use the array from the previous example

  var colors = ["green", "red", "yellow", "orange", "blue"];

  //use a for loop to access each item in colors

  //The array object has a length property

  //that contains the size of the array: you can use it in the for loop

  for (var i=0; i < colors.length; i++)

  {

  //You use the counter i to access the index position

  document.write(colors[i] + "<br />");

  }
Save your file and preview the page in a browser. You should see the color names displayed on the page.
There's also a special type of for loop that you can use with the Array object, the for ... in loop. Here's how it works:
  //use the array from the previous example

  var colors = ["green", "red", "yellow", "orange", "blue"];

  for (color in colors)

  {

  //color is the variable that marks the index position

  document.write(colors[color] + "<br />");

  }
Run the HTML document containing the code snippet above inside <script> tags in a browser. The web page should look the same as it did in the previous example.
Once you access a value inside an array you can simply retrieve it, as you did in the previous example, or you can modify it, as follows:
  var colors = ["green", "red", "yellow", "orange", "blue"];

  colors[2] = "pink";

  //Now you've replaced the item at index position 2,

  //the third item called "yellow",

  //with "pink"

  document.write(colors);

  //The code should print:

  //green,red,pink,orange,blue ("pink" has replaced "yellow")
Can I sort array items?
You can do amazing stuff with values stored inside an array. For example, you can sort items alphabetically, in descending or ascending order, or numerically. Let's see how this is done.
You sort array elements with a fantastic method most appropriately called sort(). Here it is in action:
  //sort the colors array alphabetically and ascending:

  var colors = ["green", "red", "yellow", "orange", "blue"];

  var ascendingColors = colors.sort();

  //display each value

  document.write(ascendingColors);

  //This should print:

  //blue, green, orange, red, yellow
If you want to sort numerical values inside an array, either in ascending or descending order, you need to build a simple custom function and pass this function as argument to the sort() method. It sounds a bit harder than it actually is. Here's how it's done:
  //build a new array containing number values

  var myNumbers = [4, 2, 10, 6, 9];

  //build your custom function: this is a simple formula

  function sortAscending(a, b)

  {

  //the formula return a - b sorts the numbers

  //from the smaller to the bigger,

  //the formula return b - a sorts numbers in descending order,

  //that is, from the bigger to the smaller number

  return a - b;

  }

  //pass the sortAscending function as argument to sort()

  var sortedAscending = myNumbers.sort(sortAscending);

  //print result on the page

  document.write(sortedAscending);

  //This should print:

  //2,4,6,9,10 .  Now try sorting in descending order on your own.
How do I add data to the Array object?
You can add new items inside an array in different ways. Which method you choose depends largely on your program's requirements.
Add items to the end of the array with push()
What feels more like the natural order of things, that is, adding an item to the end of an array, is easily achieved using the push() method. Here's how it works:
  //use our old colors array

  var colors = ["green", "red", "yellow", "orange", "blue"];

  //use push() to add the color "pink" at the end

  colors.push("pink");

  //print the enlarged array

  document.write(colors);

  //This should print:

  //green,red,yellow,orange,blue,pink
Add items to the beginning of an array with unshift()
Use unshift() to add new items to the start index position of an array. This is easily done.
Just replace push() with unshift() in the previous example, save your work and run the page in a browser. The page should display the color name "pink" at the very start, like so:
pink,green,red,yellow,orange,blue.
How do I remove data from the Array object?
If you want to remove the last item in an array you use pop(). If you want to remove the first item in an array you use shift().
  var colors = ["green", "red", "yellow", "orange", "blue"];

  //remove "blue" from colors

  colors.pop();

  document.write(colors);

  //This prints: green,red,yellow,orange


  //remove "green" from colors

  colors.shift();

  document.write("<br />" + colors);

  //This prints: red,yellow,orange

  //on a new line break
Have fun experimenting with the examples above and come back to our try out challenge as soon as you're ready.
Try out: Username registration
You will build a mock Username registration program with the following requirements:
- the user can enter a Username in the inputbox, and click a button to register;
- if the Username already exists, the program informs the user;
- if the Username is not already stored in the program, the new Username is added, the user is informed, and all stored Usernames are displayed on the page in alphabetical order.
A real registration program would ask for more information, the data would be permanently stored in a database, and existing Usernames would never be printed out for everybody to see.
However, this is a mock application: our Usernames are stored in a global array. This ensures that the values inside will be accessible from any function in the script, and the newly added Usernames will be preserved for as long as the program runs. Displaying the Usernames on the page will show the workings of the global variable (see Lesson 4 for a refresher on global variables) as well as of the array methods push() and sort().
Enough talking, let's get coding! Prepare an HTML page with an inputbox, a button, and a paragraph to display messages to the user. Make sure each element has an id value so that your code can have an easy handle on them.
The HTML document
  <!DOCTYPE html>
  <html>
  <head>
  <title>Lesson 13: JavaScript Objects - Arrays</title>
  <script type="text/javascript" src="lesson13_tryout.js"></script>
  </head>
  <body>
  <h1>Lesson 13: Register with us</h1>

  <p>Register a Username: <input type="text" id="txtName" /></p>

  <p><input type="button" id="btnSubmit" value="Register" /></p>

  <p id="result"></p>

  </body>
  </html>
The JavaScript file: lesson13_tryout.js
Your program contains:
- a global array called userNames used to store Usernames;
- a function called init() used to bind the main function to the onclick event of the button;
- and a function called registerName() that performs all the main program tasks.
  //global array: it's outside any function

  var userNames = ["harry potter", "donald duck", "shrek", "supercoder"];


  /*******************************/


  //init() function

  function init()

  {

  var myButton = document.getElementById("btnSubmit");

  myButton.onclick = registerName;

  }


  //assign init() function to onload event

  onload = init;


  /********************************************/


  //registerName() function: it executes when user clicks the button

  function registerName()

  {

  //set up main vars: Username entered by user,

  //a message string to communicate with the user,

  //a reference to the paragraph used to display the message,

  //and a boolean var (true/false) used as flag:

  //if the registration is successful, this is set to true,

  //if registration fails, this is set to false. It's initialized as false.

  //Notice how you chain getElementById(), value, and toLowerCase

  //to store the value entered by the user in lowercase

  var newName = document.getElementById("txtName").value.toLowerCase();

  var message = "";

  var result = document.getElementById("result");

  var success = false;

  //If the user clicks the button but the inputbox is empty

  //we alert the user and stop further program execution:

  if (newName == "")

  {

  alert("Please, enter a Username");

  return false;

  }

  //we loop over each Username stored in the array

  //to make sure the Username is not already in existence

  for (var i = 0; i < userNames.length; i++)

  {

  //if we find a Username equal to the newly entered name,

  //it means the Username already exists and we can't

  //proceed with registration

  if (userNames[i] == newName)

  {

  message = "Sorry, the Username " + userNames[i] + " already exists.  Try again";

  result.innerHTML = message;

  //set the success flag to false so the rest of the program knows

  //that registration failed

  success = false;

  //stop further program execution

  return false;

  }

  //else - if the Username entered by the user

  //is not already stored in the application, register new user:

  else

  {

  message = "Great, you've successfully registered with us as " + newName;

  result.innerHTML = message;

  //set the success flag to true, so the program knows

  //the new Username can be added

  success = true;

  }

  }

  //Now you're out of the loop

  //if registration was successful (success flag is true),

  //add new Username to the array with push()

  if (success)

  {

  userNames.push(newName);

  }

  //display Usernames sorted alphabetically on a new line

  result.innerHTML += "<br />" + userNames.sort();

  }
Save all your files and run the HTML document in a browser. You should see something similar to the example page indicated by following the link above.
Try clicking the button without entering anything in the inputbox, then enter a Username already present in the array - for example, supercoder - and try to register; finally, enter a new name and see it getting added to the array. As you enter new names, these get added to the array and displayed alphabetically.
Summary
You've worked really hard in this lesson, well done! You're now familiar with the Array, a powerful JavaScript object, and some of its fantastic methods. You can also use a for in loop to access array values, and you've built a challenging little demo application.
Lesson 14: JavaScript Living Space - the Browser Environment
As we have seen, the JavaScript language is made up of objects, their properties and methods. Your JavaScript code is interpreted and executed by a web browser. Therefore, JavaScript lives and comes alive in the browser environment.
This environment, in its turn, is also present in the JavaScript language, and obviously it is so in object form. Better yet, in the form of several objects, their properties and methods.
In this lesson you will be presented with a quick overview of the main objects making up the browser environment.
In particular, you will learn about:
- the Browser Object Model (BOM);
- the Document Object Model (DOM);
- accessing, adding, and removing DOM elements and attributes.
What is the Browser Object Model (BOM)?
The BOM is a a collection of objects that represent the browser and the computer screen. These objects are accessible through the global objects window and window.screen.
The window object is global to the extent that it represents the very host environment of all other JavaScript objects. It's so fundamental, that you've already used it without needing to invoke it explicitly.
In fact, you already used alert() and onload. You didn't need explicitly to write window.alert() because the global window object was already presupposed.
Also, you could think about the window object as being at the top of a tree-like hierarchy of other objects, its descendants, or children. In fact, it's quite common for programming languages to use family-related metaphors to refer to objects representing their environment.
You will have occasion to work further with the window object through the rest of this tutorial. For now, let's move on to the Document Object Model (DOM).
What is the Document Object Model (DOM)?
One of the most interesting children of the window object, certainly from the point of view of JavaScript, is the Document object. This gives access to the all the elements that make up your HTML document.
The DOM is an ever evolving standard defined by the World Wide Web Consortium (W3C) implemented with varying degrees of consistency among different kinds of browsers. It contains a wealth of properties and methods that enable you to access and manipulate anything you can think of in an HTML document. So far you've used document.write() to write on the HTML page, and document.getElementById() to get a hook on an HTML element. But there's a lot more.
For example, here's all the info the document object can be made to yield when appropriately nudged. Insert the following code inside enclosing <script> tags of an HTML page and preview its content in a browser:
  //Set up your variables to represent

  //bits of info about your document:

  var myTitle = document.title;

  var myUrl = document.URL;

  var myLastModification = document.lastModified;

  var myInfoString = "The title of my document is: " + myTitle + "<br />";

  myInfoString += "My document's URL is: " + myUrl + "<br />";

  myInfoString += "My document was last modified on: " + myLastModification;

  document.write(myInfoString);
That's so cool. Let's have a look at how the HTML page is represented in the DOM.
What does a DOM representation of an HTML page look like?
The DOM represents HTML elements in a top-down tree-like structure. For instance, let's consider the following simple HTML document:
  <html>
  <head>
  <title>Lesson 14: DOM</title>
  </head>
  <body>

  <p>Lorem ipsum ...</p>

  <p>Lorem ipsum ...</p>

  <p>link <a href="http://html.net">HTML.net</a></p>

  </body>
  </html>
The DOM representation of the elements in the HTML page above is as follows:
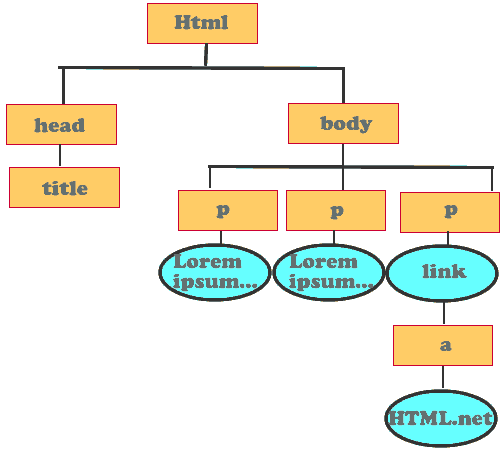
The DOM elements are also known as nodes. Family-related metaphors are also used to represent the relationships and the position of each node with respect to the others. In connection to the DOM tree graphic above, we find:
-
The <html> node
The <html> element or node, is parent to all other nodes. In fact, all other DOM nodes are nested inside the <html> node;
-
<head> and <body> nodes
Next, we find 2 elements: the <head> and the <body>. These have a parent/child relationship with the <html> element (the parent). Because both are on the same level, they're siblings with respect to each other;
-
<title> and <p> nodes
The next level down is occupied by the <title> as child of the <head>, and 3 <p> elements as children of the <body>. In our sample HTML page above, <title> and <p> tags are siblings when considered with respect to each other;
-
Text nodes
The text inside the <p> tags, and the text inside the anchor tag are called text nodes. In this case they're children of the <p> element and the <a> element respectively;
-
Anchor tag
The next level down is occupied by an anchor tag, which is child to one of the <p> tags.
How do I access DOM elements?
Use one of the 2 following methods of the document object to access DOM elements.
Get the DOM element by its id attribute
The most widely used method of the document object to access DOM elements is certainly our old friend document.getElementById(elementId). This is the most appropriate way of accessing 1 HTML element at a time.
  var inputBox = document.getElementById("txtHello");

  alert(inputBox);

  //if you run this code in an HTML page containing

  //an input element called txtHello, you should see

  //[object HTMLInputElement] displayed in an alert box.
Get DOM elements by tag name
Another popular way of accessing DOM elements is by using their tag name in the HTML mark-up. This is a handy way of grabbing all HTML elements in one go that have a tag name in common, such as images, links, list items, etc. You can store a reference to these elements in an array and manipulate them via JavaScript.
For example, in an HTML page containing a list and 3 list items, you can access each list item and modify their color and background-color style properties by inserting the following code in enclosing <script> tags:
  //Retrieve all 3 list items and store them in an array

  var listElems = document.getElementsByTagName("li");

  //loop over each list item and access the style property

  for (var i = 0; i < listElems.length; i++)

  {

  //Notice how you write backgroundColor,

  //NOT background-color as you would in CSS:

  listElems[i].style.backgroundColor = "red";

  listElems[i].style.color = "white";

  }
Run your HTML page in the browser. You should see something like the page indicated by following the example link above.
How do I add DOM elements?
In previous lessons you used the practical and easy innerHTML property of an HTML element to add new stuff to your web page, be it new mark-up or new text.
However, innerHTML, although widely used, has not been recognized as a standard by the W3C. The DOM standard way to add new elements to an HTML page via JavaScript is done as follows. Enter the code below in enclosing <script> tags inside an HTML page:
  //First create a <p> element with createElement(element):

  var newParagraph = document.createElement("p");

  //Then add <p> to the <body> tag with appendChild():

  document.body.appendChild(newParagraph);

  //Now create the text that goes inside the new <p> element

  //with createTextNode():

  var newTextPara = document.createTextNode("Hello DOM standard");

  //Finally, add the new text inside the <p> tag:

  newParagraph.appendChild(newTextPara);
You can also add attributes to the newly created DOM nodes with setAttribute(attrType, attrName), and later retrieve them with getAttribute(attrType). Using the code snippet above, you can add an id called newParagraph to the newly created paragraph like so:
  var newParagraph = document.createElement("p");

  //setAttribute has 2 string arguments: the attribute we want to set

  //and the name we want to apply to the attribute.

  //Here we create an id attribute called newParagraph:

  newParagraph.setAttribute("id", "newParagraph");

  document.body.appendChild(newParagraph);

  var newTextPara = document.createTextNode("Hello DOM standard");

  newParagraph.appendChild(newTextPara);

  //getAttribute() has one string argument: the type of attribute

  //we want to retrieve:

  alert("The Id of the new paragraph is: " + newParagraph.getAttribute("id"));
Save your work and preview it in a browser. You should see something like the page indicated by following the example link above.
As you can see, there are at least 2 steps you need to take to insert fresh stuff inside an HTML page with JavaScript:
- create the new content: to do this you use either createElement(element) in case of an HTML tag, or createTextNode(text) in case of new text content;
- append the newly created DOM node to the appropriate location in the HTML document.
I know, it's a bit more involved than the straightforward innerHTML, but it's standard-compliant.
How do I remove DOM elements?
That's pretty simple stuff. First grab the DOM node you want to remove, then use removeChild(elementToRemove).
Prepare a simple HTML document with a <p> element and an input button like so:
  <!DOCTYPE html>
  <html>
  <head>
  <title>Lesson 14: Delete DOM Element</title>
  </head>
  <body>
  <h1>Lesson 14: Delete DOM element</h1>

  <p id="remove">I'm going to be removed.</p>

  <input type="button" value="Delete paragraph" onclick="deleteParagraph()" />

  </body>
  </html>
Note that the onclick attribute of the button element contains a call to the deleteParagraph() function. Let's write this function inside enclosing <script> tags in the <body> of our HTML page:
  function deleteParagraph()

  {

  //retrieve the element you want to remove:

  var remove = document.getElementById("remove");

  //use removeChild(elementToRemove) to delete the element

  document.body.removeChild(remove);

  }
Save your work, run it in a browser, and click the button. You should see something like the page indicated by following the example link above: after you click the button the paragraph should be removed from the page.
Summary
In this lesson you got introduced to the concepts of Browser Object Model (BOM) and Document Object Model (DOM). You also learned a few methods of the document object to access, modify, add, and delete HTML elements in a standard-compliant manner.
Lesson 15: Useful Tasks (I) – Setting and Retrieving Cookies
You've come a long way in this tutorial. You're ready to look more closely at how JavaScript performs a real world task: setting and retrieving cookies.
In this lesson, you will learn:
- what a cookie is;
- how you can store cookies on your website visitors' computer;
- how you can retrieve the cookie and use the values stored in it on the web page.
In the process, you will have occasion to use the global escape() function, the split() method of the String object, and the toGMTString() method of the Date object.
What's a cookie?
The values stored in JavaScript variables are destroyed as soon as the browser is closed or the page is reloaded. Therefore, if you use an input box on your web page to store visitors' names in a variable, that value is lost as soon as they leave the page.
A common feature present in most websites today is some sort of personalization mechanism whereby web visitors are recognized. Some instances of this personal touch can be things like greeting returning visitors by their name, indicating how long it's been since the last visit to the website, showing some products that might be of interest to the user based on past purchases, etc.
As you might have guessed, we're dealing with values, and if we want to use them in our JavaScript program, we need a storage place for them. However, all storage places examined so far are temporary. We need something that persists in between visits to our web page.
This is where cookies enter the scene.
Cookies are strings of text containing small pieces of data about your website visitors. They are stored by the browser in your visitors' computers. Each cookie has a name and an expiration date, and is separated from other cookies by a semicolon ( ; ). The fact that cookies are all stored in the same place, retrieving a specific cookie out of the collection to read its values calls for some little work on our part.
However, before we can retrieve a cookie, we need to write one and store it in the visitor's browser.
How do I set cookies with JavaScript?
Cookie data is stored in the document object's cookie property. The data is stored as "name=value" pairs, in which the values may not contain any whitespace, commas ( , ) and semicolons ( ; ). This is why we use the escape() method, which enables us to encode the string in Unicode format (e.g., a space is represented as %20).
By default the lifespan of cookies is limited to the current browser session. However, by setting an expiry date in the form of an "expires=date" pair, we can prolong the cookie's life (unless the user decides to delete the cookies stored on her machine). The date value is a GMT string, which can be obtained by using the Date object and its toGMTString() method.
If you insert the code snippet below inside enclosing <script> tags of an HTML page, you set a cookie named "myCookie" on your visitor's computer, that expires after a minute starting from the time of its creation:
  //If no cookie is present, we create one

  if (! document.cookie)

  {

  var cookieName = "Test Cookie";

  //escape the string to make sure there are

  //no unallowed characters

  var myCookie = escape(cookieName);

  //set the expiry date to 1 minute from creation date:

  //get current date and add 1 minute reduced to milliseconds:

  var expiryDate = new Date();

  expiryDate.setTime(expiryDate.getTime() + (60 * 1000));

  //create the myCookie cookie and add it

  //to the cookie property of the document object:

  //in name=value pairs separated by ;

  document.cookie = "myCookie=" + myCookie + ";" + "expires=" + expiryDate.toGMTString() + ";";

  //leave a message to the user:

  document.write("Thank you, " + cookieName + " is your cookie");

  }
That's all set. The browser running a page containing the code snippet above, will store a cookie by the name "myCookie" with a value of "Test Cookie", that expires after 1 minute.
How do I retrieve and use cookies in my web page?
Retrieving cookies to read their values requires the use of a couple of methods. First, you need to unescape the name value that you previously escaped. This means that, if your name value contained a space, it was escaped by replacing the space with %20. Now that you're reading the value back from the cookie name, you need to replace %20 with a space character. This is easily done with the unescape() method.
Secondly, you need to extract each name-value pair separately from the cookie string. You do this with the split() method of the String object.
split() is used to split a string into an array of comma ( , ) separated substrings. It takes an optional argument called separator. This specifies the character to use for splitting the string.
The code snippet below will check if cookies are present in the cookie property of the document object. If they are, the script extracts and displays the values of the "myCookie" cookie.
  //continue from the previous code snippet

  else

  {

  var myCookieString = unescape(document.cookie);

  //create a comma-separated array of substrings from the string

  //containing the cookie values by using

  //split() with "=" as separator.

  //Remember name/value pairs in the cookie

  //string are separated by an = sign:

  var dataList = myCookieString.split("=");

  //check that the name at index position 0 is

  //"myCookie" (remember the cookie name from previous example):

  if (dataList[0] === "myCookie")

  {

  //let's extract the value of myCookie

  //by using split() once again.  Now the items in

  //dataList array are separated by " , ".

  //This will be our separator in the split() method.

  //Item 1 (index 0) is the cookie name,

  //item 2 (index 1) is the value, which is what we need:

  var data = dataList[1].split(",");

  //Now we have a new array of strings called data.

  //containing only the cookie value ("Test Cookie"),

  //which is at index 0.  We extract it:

  var cookieName = data[0];

  }

  //Now we display a personalized greeting

  document.write("Welcome back, here's your cookie, " + cookieName);

  }
Summary
Setting and retrieving cookies to make your website visitors feel welcome is a widely used practice on the web, therefore it's a great new skill to add to your JavaScript toolbox.
Lesson 16: Useful Tasks (II) – Form Validation
A web form is a staple feature of almost any website today. Nothing can be more frustrating for your visitors than filling out all form fields, clicking the submit button, and have the entire form come back, emptied of all their carefully entered values, and displaying a cryptic error message expecting them to start all over again.
Any data that comes from users must be validated. This means that programs must check that no empty values are submitted, that submitted values are of the right type and length, etc. However, such checks are necessarily performed after the user has filled out and submitted the form to the server.
If the server is busy and takes a while before alerting the user that the form could not be accepted due to errors, users might get quite annoyed and decide not to come back to your otherwise fantastic website.
Thankfully, this rarely happens nowadays, thanks to JavaScript. In fact, although it's crucial that checking user input must be done on the server (e.g., php, .net, ruby, etc.), client-side JavaScript can do a lot to make the experience less painful and time consuming.
JavaScript runs in the user's browser, therefore it executes immediately. There's no need for the form to be submitted to the server before alerting the user that, for example, she has left one of the required fields empty.
In this lesson, you will learn how to:
- make sure users fill out all required form fields;
- make sure users enter a valid email.
How do I validate empty form fields?
In previous lessons you already performed some validation tasks. For example, you used isNaN() to make sure users entered a number data type. You also checked users didn't submit an empty value by using something like if (inputboxValue == "") { alert user...}. Let's see what else you could do to prevent users from submitting an empty form field.
Prepare an HTML document with a form and a button, like the one below:
  <!DOCTYPE html>
  <html>
  <head>
  <title>Lesson 16: Form validation</title>
  </head>
  <body>
  <h1>Lesson 16: Form validation</h1>

  <form id="myForm" action="#" method="post">

  <fieldset>

  <p><label for="txtName">First Name:</label>

  <input type="text" id="txtName" name="txtName" />

  </p>

  <p><input type="submit" value="Submit" onclick="validate()" /></p>

  </fieldset>

  </form>

  <script type="text/javascript">

  </script>

  </body>
  </html>
In between <script> tags write the validate() function as follows:
  function validate()

  {

  var userName = document.getElementById("txtName").value;

  //if the length of the string value is 0,

  //it means the user has entered no value:

  if (name.length == 0)

  {

  alert("Please, enter your name");

  return false;

  }

  else

  {

  alert("Thank you, " + userName);

  }

  }
Save your work and run the page in a browser. Try submitting the form leaving the inputbox empty, and see what happens. Can you post the form? I hope not.
How do I validate email addresses?
Email addresses present a characteristic pattern. We know that they have one @ character and at least a dot ( . ) character.
More detailed patterns of email addresses, as well as of domain names, zip codes, telephone numbers, etc., can be validated using a powerful feature called regular expression. A treatment of regular expressions is beyond the scope of this tutorial. However, if you're interested the web offers a wealth of material on the subject.
In our code snippet we use some string manipulation methods to make sure the value entered by the user has an @ character and a dot.
  <!DOCTYPE html>
  <html>
  <head>
  <title>Lesson 16: Form validation</title>
  </head>
  <body>
  <h1>Lesson 16: Form validation</h1>

  <form id="myForm" action="#" method="post">

  <fieldset>

  <p><label for="txtEmail">Email:</label>

  <input type="text" id="txtEmail" name="txtEmail" />

  </p>

  <p><input type="submit" value="Submit" onclick="validate()" /></p>

  </fieldset>

  </form>

  <script type="text/javascript">

  </script>

  </body>
  </html>
Now, change the validate() function as follows:
  function validate()

  {

  var email = document.getElementById("txtEmail").value;

  //still check user entered a value

  if (email.length == 0)

  {

  alert("Please, enter an email address");

  return false;

  }

  //if the index position of the @  or . characters

  //is -1 (any value bigger than this, including 0,

  //means the character is present)

  else if (email.indexOf("@") == -1 || email.indexOf(".") == -1)

  {

  alert("Please, enter a valid email address");

  return false;

  }

  //if we get here, all went well

  else

  {

  alert("Thank you");

  }

  }
Save your work and preview the page in a browser. Now, enter an email address with no @ character or no dot charachter. Is your form submitting the value to the server? Hopefully, it isn't.
Try out: form validation demo
In this try out you will build a JavaScript program that checks user input (name and email) before web form submission. Prepare an HTML page containing a form with 2 inputboxes and a button, and add a paragraph with an id attribute called result to display messages to the user, like the one below:
  <!DOCTYPE html>
  <html>
  <head>
  <title>Lesson 16: Form validation</title>
  <script type="text/javascript" src="lesson16.js"></script>
  </head>
  <body>
  <h1>Lesson 16: Form validation</h1>

  <form id="myForm" action="#" method="post">

  <fieldset>

  <p><label for="txtName">Name:</label>

  <input type="text" id="txtName" name="txtName" />

  <p><label for="txtEmail">Email:</label>

  <input type="text" id="txtEmail" name="txtEmail" />

  </p>

  <p><input type="submit" value="Submit" /></p>

  </fieldset>

  </form>

  <p id="result"></p>

  </body>
  </html>
Now create the lesson16.js file. This contains 5 functions:
- init() binds the main function, validate(), to the form's onsubmit event;
- validate() examines the results returned by functions validating required fields and email format and displays an appropriate message;
- validateRequired(input) checks the input box has a value. It returns true if it has and false if it hasn't;
- validateEmail(email) checks the email is valid and returns true if it is, false if it isn't;
- writeMessage(text) displays a message to users when something goes wrong. It would be annoying to have alerts popping up every time an error occurs.
  function init()

  {

  var myForm = document.getElementById("myForm");

  myForm.onsubmit = validate;

  }


  /********************************/


  //bind init() function to onload event

  onload = init;


  /******************************************/


  //validate() checks answers from validateRequired()

  //and validateEmail() and displays appropriate messages.

  //If an error occurs program execution is stopped:

  function validate()

  {

  var name = document.getElementById("txtName").value;

  var email = document.getElementById("txtEmail").value;

  //validateRequired() and validateEmail()

  //return true/false values: create

  //variables to store the result

  var isRequiredNameSet = false;

  var isRequiredEmailSet = false;

  var isEmailValid = false;

  //create variable that holds message to display

  var message = "";

  isRequiredNameSet = validateRequired(name);

  isRequiredEmailSet = validateRequired(email);

  isEmailValid = validateEmail(email);

  //if all values are valid, prepare thank you message

  //and allow form submission

  if (isRequiredNameSet && isRequiredEmailSet && isEmailValid)

  {

  message = "Thank you, your details have been successfully posted!";

  }

  //if the name field is empty, write message to user and stop submission:

  else if (! isRequiredNameSet)

  {

  message = "Please, enter a name";

  writeMessage(message);

  return false;

  }

  //If the email field is empty, write message to user and stop submission:

  else if (! isRequiredEmailSet)

  {

  message = "Please, enter an email";

  writeMessage(message);

  return false;

  }

  //If the email is not in a valid format (no @ or . characters),

  //we write a message to the user and stop program execution:

  else if (! isEmailValid)

  {

  message = "Please, enter a valid email";

  writeMessage(message);

  return false;

  }

  //If we are here validation is successful:

  //display the thank you message with an alertbox:

  alert(message);

  }


  /***********************************************/


  //This function takes an argument

  //that represents the input element and checks

  //that it's not empty - it returns true if input is valid

  //and false if input is not valid:

  function validateRequired(input)

  {

  var isValid = false;

  if (input.length == 0)

  {

  isValid = false;

  }

  else

  {

  isValid = true;

  }

  return isValid;

  }


  /**********************************************/


  //validateEmail(email) checks the email is in valid

  //format and returns true if it is, false if it isn't:

  function validateEmail(email)

  {

  var isValid = false;

  if (email.indexOf("@") == -1 || email.indexOf(".") == -1)

  {

  isValid = false;

  }

  else

  {

  isValid = true;

  }

  return isValid;

  }


  /**********************************************/


  //writeMessage(text) has the message to

  //display to the user as argument, clears any previous

  //content from the paragraph with the id of result

  //and inserts the appropriate message for display

  //using DOM compliant techniques (lesson 14):

  function writeMessage(text)

  {

  var paragraph = document.getElementById("result");

  //The content inside the paragraph is the paragraph's

  //first child.  We check if there is any content and remove it:

  if (paragraph.firstChild)

  {

  paragraph.removeChild(paragraph.firstChild);

  }

  //Now we can create and append the new

  //message to display to the user:

  paragraph.appendChild(document.createTextNode(text));

  }
Save your work and preview it in a browser. You should see something like the page indicated by following the example link above.
Try clicking the submit button without filling out the form properly. If all goes as expected, you should not be able to submit your form unless it's values are complete and appropriate.
Obviously, your script can't verify an email address, but it can validate its format. Finally, keep in mind that for a detailed check of the email pattern, the best tool for the job is a regular expression.
Lesson 17: JavaScript Timing Events
The global window object offers a few little functions that are great if you want to create the effect of movement or of passing time on the web.
In this lesson, you will learn about:
- setTimeout();
- clearTimeout();
- setInterval();
- clearInterval().
In the process, you will also learn how to preload images with JavaScript and how to build a simple photo gallery application.
How do I use setTimeout()?
If your program has a chunk of code that needs to be executed after a specified time, then setTimeout(actionToExecute, timeInMilliseconds) is your function.
Let's see it in action. In this simple example, we will call up an alertbox 2 seconds after page load. Type the code below in enclosing <script> tags on a simple HTML page:
  //Package the code to insert in the

  //timer in a simple function:

  function sayHello()

  {

  alert("Hello");

  }

  //Package the timer into its own function

  function timeGreeting()

  {

  //assign the timer to a variable:

  //you need to do this so the timer can be

  //referenced by another function when you want

  //to stop it:

  var greeting = setTimeout(sayHello, 2000);

  //Notice how the time is set in milliseconds.

  }

  //Now call the timer function

  timeGreeting();
Save your work and run it in a browser. After 2 seconds, an alertbox should pop up to greet you.
How do I use setInterval()?
If you need to execute a chunk of code at specified time intervals, then setInterval(codeToExecute, timeIntervalInMilliseconds) is your function.
To see it in action in its most annoying manifestation, just replace setTimeout with setInterval in the previous example and you're done.
Now you should see an alertbox greeting you every 2 seconds! That's enough, just close that window in your browser and let's modify our script so that we can put a stop to that nuisance.
How do I stop the timer?
JavaScript offers 2 handy methods to get rid of timers: clearTimeout(timerVariable) if your timer uses setTimeOut(), and clearInterval(timerVariable) if your timer uses setInterval(). Let's put clearInterval() to good use right away by stopping that annoying alertbox. First of all, add an inputbox to your HTML page, like so:
<input type="button" value="Stop timer" onclick="stopTimer()" />
Next, rewrite the preceding JavaScript code and then add the new function as follows:
  //Make the variable holding the timer

  //global, so that it can be accessed both

  //by the function setting the timer and by the function

  //stopping the timer:

  var greeting;


  //sayHello() remains unchanged from the previous example

  function sayHello()

  {

  alert("Hello");

  }


  //we increase the time interval

  //to give more time to the user to

  //click the button that stops the alert:

  function timeGreeting()

  {

  greeting = setInterval(sayHello, 5000);

  }


  timeGreeting();


  //package the code that cancels the timer

  //in its own function that will be called when

  //the button on the page is clicked:

  function stopTimer()

  {

  //you call clearInterval() and pass the variable

  //containing the timer as argument

  clearInterval(greeting);

  }
Save your work and preview it in a browser. Just click the button and the annyoing alertbox disappears: that's much better, great! I leave you to experiment with clearTimeout() on your own.
Try out: a photo gallery application
JavaScript timers are often used to produce animation effects on the web. Photo galleries are one of those widely used applications that often employ JavaScript timers.
It's easy to find a number of sophisticated photo gallery widgets on the web, that you can download and readily plug into your own web page.
However, it's still nice to be able to build a simple prototype, just to really challenge yourself with your newly gained knowledge. In any case, your application can be considered a work in progress, something that evolves and grows as your JavaScript programming skills evolve and grow.
At this stage, your photo gallery will consist of a photo container and 2 buttons: one button to stop the gallery, and one button to restart the gallery. As soon as the page loads, the gallery automatically displays its images one at a time every 2 seconds.
You will also need a few images, possibly all of the same size. For this demo, I prepared four 620px X 378px graphics and saved them in their own images folder.
Let's start from the HTML page. This is made of a <div>, an <img> tag, and 2 <input> tags. Also included are: 1) a small style declaration in the <head> of the document to the effect that the <div> element that contains the gallery will be centered and sized to the same width and height as the gallery graphics; and 2) a reference to an external JavaScript file at the bottom of the <body> element of the HTML page. This location is the most appropriate one because we need to make sure the HTML page and, most importantly, the image referenced by the <img> tag, are fully loaded before the script kicks in.
  <!DOCTYPE html>
  <html>
  <head>
  <title>Lesson 17: JavaScript Timing Events</title>
  <style type="text/css">
    #gallery
   {
   width:620px;
   height:378px;
   margin: 0 auto;
   border:2px solid #ccc;
   }
  </style>
  </head>
  <body>
  <h1>Lesson 17: My Photo Gallery</h1>

  <div id="gallery">

  <img src="images/1.jpg" alt="Photo gallery image" id="photo" />

  <input type="button" id="btnStart" value="Restart gallery" />

  <input type="button" id="btnStop" value="Stop gallery" />

  </div>

  <script type="text/javascript" src="lesson17.js"></script>

  </body>
  </html>
Now prepare the lesson17.js file. Your JavaScript code consists of 3 functions:
- init() contains initialization routines: it preloads the photo gallery images so that they will be ready for display as soon as the script calls them. In addition, it binds event handlers to the 2 button elements to stop and restart the gallery;
- startGallery() displays each graphic in the gallery every 2 seconds;
- stopGallery() stops the gallery so that the photo that comes next with respect to the current photo is not displayed.
Furthermore, the code contains a few global variables at the top that need to be accessed by all the functions in the script. Let's get started.
  //Global variables: a reference to the

  //photo currently displayed on the page,

  var curImage = document.getElementById("photo");

  //a variable to store the timer,

  var galleryStarter;

  //a variable to store a true/false value indicating

  //to the program whether the gallery is on or off,

  var isGalleryOn = true;

  //an array containing 4 strings representing the filepaths

  //to the image files in the images folder,

  var images = ["images/1.jpg", "images/2.jpg", "images/3.jpg", "images/4.jpg"];

  //an empty array that will be filled with 4 preloaded

  //image objects: the src property of these image objects will correspond

  //to the filepaths contained in the images[] array,

  var preloadedImgs = [];

  //a variable that works as our counter to

  //advance from one image to the next.  It starts at 0.

  var counter = 0;


  /**************************************/


  //Init() starts with the image preloading routine.

  //First fill the preloadedImgs[] array with a

  //number of image objects corresponding to the length

  //of the images[] array:

  function init()

  {

  for (var i = 0; i < images.length; i++)

  {

  preloadedImgs[i] = new Image();

  }

  //now assign the value of the strings contained in the

  //images[] array to the src property of each image object

  //in the preloadedImgs[] array, using one more loop:

  for (var i = 0; i < preloadedImgs.length; i++)

  {

  preloadedImgs[i].src = images[i];

  }

  //Now, assign event handlers to the 2 buttons

  //to restart and stop the gallery:

  var btnStart = document.getElementById("btnStart");

  var btnStop = document.getElementById("btnStop");

  btnStart.onclick = startGallery;

  btnStop.onclick = stopGallery;

  //Finally, check the isGalleryOn flag is true.  If it is

  //call the function that starts the gallery:

  if (isGalleryOn)

  {

  startGallery();

  }

  }


  /*********************************************/


  //Assign the init() function to the onload event

  onload = init;


  /***********************************************/


  //startGallery() contains the functionality

  //to extract the photos from the preloadedImgs[] array

  //for display and to set the timer in motion:

  function startGallery()

  {

  //extract the image filepath using the counter

  //variable as array index and assign it to the src

  //property of the curImage variable:

  curImage.src = preloadedImgs[counter].src;

  //advance the counter by 1:

  counter ++;

  //if the counter has reached the length of the

  //preloadedImgs[] array, take it back to 0, so the

  //photo gallery redisplays the images from the start:

  if (counter == preloadedImgs.length)

  {

  counter = 0;

  }

  //Set the timer using this same function as one

  //of the arguments and 2000 (2 milliseconds) as the other argument.

  galleryStarter = setTimeout("startGallery()", 2000);

  //Signal that the gallery is on to the rest of the program:

  isGalleryOn = true;

  }


  /**************************************************/


  //stopGallery() uses clearTimeout()

  //to stop the gallery

  function stopGallery()

  {

  clearTimeout(galleryStarter);

  //signal that the gallery has stopped to the

  //rest of the program:

  isGalleryOn = false;

  }
Save your work and preview it in a browser. You should see something like the page indicated by following the example link above. Try stopping and restarting your gallery.
Questions, questions, questions
I imagine you might be wondering what this business of preloading images is all about. Well, here's a short explanation.
When an HTML page is first loaded, all the resources needed by the page, including external CSS files, scripts, images, videos, etc., are downloaded as well.
In the case of inserting a resource, such as an image, dynamically into an HTML page after the page has fully loaded in the browser, as it's the case with our photo gallery, the following issue might arise: the requested image has to be sent to the client browser by the server, and this might take a few seconds. Although this is not terrible, it might seriously spoil the magic JavaScript effect we intend to create.
Here's where preloading the images in JavaScript comes to the rescue. By doing the preloading routine, the image object is created on page load, and by assigning the image filepath as value to the image object's src property, we make sure that the image we intend to add dynamically to the page is ready to be grabbed by our script for immediate use.
This is the image preloading routine simplified to the bare minimum:
  //Create an Image object:

  var myNewImage = new Image();

  //assign the filepath of your desired image

  //to the src property of the newly created image object:

  myNewImage.src = "images/testimage.jpg";

  //Now myNewImage has been preloaded: your

  //JavaScript can use it, display it, etc. without fear of

  //having to wait too long for a server request.
Summary
You've made it to the end of the lesson, congratulations! You've learned a great deal: you can set and stop timers with JavaScript, preload images for dynamic display, and build an automatic photo gallery with JavaScript.