Lesson 1: What is HTML?
HTML is the "mother tongue" of your browser.
To make a long story short, HTML was invented in 1990 by a scientist called Tim Berners-Lee. The purpose was to make it easier for scientists at different universities to gain access to each other's research documents. The project became a bigger success than Tim Berners-Lee had ever imagined. By inventing HTML he laid the foundation for the web as we know it today.
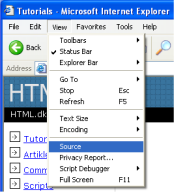
HTML is a language, which makes it possible to present information (e.g. scientific research) on the Internet. What you see when you view a page on the Internet is your browser's interpretation of HTML. To see the HTML code of a page on the Internet, simply click "View" in the top menu of your browser and choose "Source".
For the untrained eye, HTML code looks complicated but this tutorial will help you make sense of it all.
What can I use HTML for?
If you want to make websites, there is no way around HTML. Even if you're using a program to create websites, such as Dreamweaver, a basic knowledge of HTML can make life a lot simpler and your website a lot better. The good news is that HTML is easy to learn and use. In just two lessons from now you will have learned how to make your first website.
HTML is used to make websites. It is as simple as that!
Okay, but what does H-T-M-L stand for?
HTML is an abbreviation of "HyperText Mark-up Language" - which is already more than you need to know at this stage. However, for the sake of good order, let us explain in greater detail.
- Hyper is the opposite of linear. In the good old days - when a mouse was something the cat chased - computer programs ran linearly: when the program had executed one action it went to the next line and after that, the next line and so on. But HTML is different - you can go wherever you want and whenever you want. For example, it is not necessary to visit MSN.com before you visit HTML.net.
- Text is self-explanatory.
- Mark-up is what you do with the text. You are marking up the text the same way you do in a text editing program with headings, bullets and bold text and so on.
- Language is what HTML is. It uses many English words.
In this tutorial you will learn so-called XHTML (Extensible HyperText Mark-up Language) which, in short, is a new and more well-structured way of writing HTML.
Now you know what HTML (and XHTML) stands for let's get started with what it is all about: making websites.
Lesson 2: Elements and tags
You are now ready to learn the essence of HTML: elements.
Elements give structure to a HTML document and tells the browser how you want your website to be presented. Generally elements consists of a start tag, some content, and an end tag.
"Tags"?
Tags are labels you use to mark up the begining and end of an element.
All tags have the same format: they begin with a less-than sign "<" and end with a greater-than sign ">".
Generally speaking, there are two kinds of tags - opening tags: <html> and closing tags: </html>. The only difference between an opening tag and a closing tag is the forward slash "/". You label content by putting it between an opening tag and a closing tag.
HTML is all about elements. To learn HTML is to learn and use different tags.
Can you show me some examples?
Okay, the element
em emphasis text. All text between the opening tag <em> and the closing tag </em> is emphasised in the browser. ("em" is short for "emphasis".)
Example 1:
<em>Emphasised text.</em>
Will look like this in the browser:
Emphasised text.
The elements
h1, h2, h3, h4, h5 and h6 is used to make headings (h stands for "heading"), where h1 is the first level and normally the largest text, h2 is the second level and normally slightly smaller text, and h6 is the sixth and last in the hierarchy of headings and normally the smallest text.
Example 2:
 <h1>This is a heading</h1>
 <h2>This is a subheading</h2>
Will look like this in the browser:
This is a heading
This is a subheading
So, I always need an opening tag and a closing tag?
As they say, there's an exception to every rule and in HTML the exception is that there are a few elements which both open and close in the same tag. These so-called empty elements are not connected to a specific passage in the text but rather are isolated labels, for example, a line break which looks like this:
<br />.Should tags be typed in uppercase or lowercase?
Most browsers might not care if you type your tags in upper, lower or mixed cases. <HTML>, <html> or <HtMl> will normally give the same result. However, the correct way is to type tags in lowercase. So get into the habit of writing your tags in lowercase.
Where do I put all these tags?
You type your tags in an HTML document. A website contains one or more HTML documents. When you surf the Web, you merely open different HTML documents.
If you continue to the next lesson in 10 minutes you will have made your first website.
Lesson 3: Create your first website
With what you learned in the previous lessons, you are now only minutes away from making your first website.
How?
In Lesson 1 we looked at what is needed to make a website: a browser and Notepad (or similar text editor). Since you are reading this, you most likely already have your browser open. The only thing you need to do is to open an extra browser window (open the browser one more time) so you can read this tutorial and see your new website at the same time.
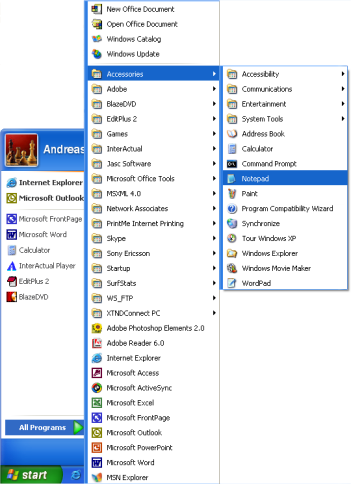
Also, open Notepad (in Accessories under Programs in the Start menu):
Now we are ready!
What can I do?
Let us start with something simple. How about a page that says: "Hurrah! This is my first website." Read on and you'll find out how simple it is.
HTML is simple and logical. The browser reads HTML like you read English: from the top down and from left to right. Thus, an simple HTML document begins with what should come first and ends with what should come last.
The first thing you need to do is to tell the browser that you will "talk" to it in the language HTML. This is done with the tag
<html> (no surprises there). So before you do anything else type "<html>" in the first line of your document in Notepad.
As you may recall from the previous lessons,
<html> is an opening tag and must be closed with a closing tag when you are finished typing HTML. So to make sure you don't forget the HTML close tag now type "</html>" a couple of lines down and write the rest of the document between <html> and </html>.
The next thing your document needs is a "head", which provides information about your document, and a "body", which is the content of the document. Since HTML is nothing if not logical, the head (
<head> and </head>) is on top of the body (<body> and </body>).
Your document should now look like this:
 <html>

   <head>
   </head>

   <body>
   </body>

 </html>
Note how we structured the tags with new lines (using the Enter key) as well as indents (using the Tab key). In principle, it does not matter how you structure your HTML document. But to help you, and others reading your coding, to keep an overview, it is strongly recommended that you structure your HTML in a neat way with line breaks and indents, like the above example.
If your document looks like the above example, you have made your first website - a particularly boring website and probably not what you dreamt of when you started this tutorial but still some sort of a website. What you have made will be the basic template for all your future HTML documents.
So far so good, but how do I add content to my website?
As you learnt earlier, your HTML document has two parts: a head and a body. In the head section you write information about the page, while the body contains the information that constitutes the page.
For example, if you want to give the page a title which will appear in the top bar of the browser, it should be done in the "head" section. The element used for a title is
title. I.e. write the title of the page between the opening tag <title> and the closing tag </title>:
<title>My first website</title>
Note that this title will not appear on the page itself. Anything you want to appear on the page is content and must therefore be added between the "body" tags.
As promised, we want the page to say "Hurrah! This is my first website." This is the text that we want to communicate and it therefore belongs in the body section. So in the body section, type the following:
<p>Hurrah! This is my first website.</p>
The p in
<p> is short for "paragraph" which is exactly what it is - a text paragraph.
Your HTML document should now look like this:
 <html>

   <head>
   <title>My first website </title>
   </head>

   <body>
   <p>Hurrah! This is my website.</p>
   </body>

 </html>
Done! You have now made your first real website!
Next all you have to do is to save it to your hard drive and then open it in your browser:
- In Notepad choose "Save as..." under "File" in the top menu.
- Choose "All Files" in the "Save as type" box. This is very important - otherwise, you save it as a text document and not as an HTML document.
- Now save your document as "page1.htm" (the ending ".htm" indicates that it is an HTML document. ".html" gives the same result. I always use ".htm", but you can choose whichever of the two extensions you prefer). It doesn't matter where you save the document on your hard drive - as long as you remember where you saved it so you can find it again.

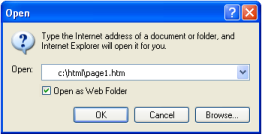
Now go to the browser:
- In the top menu choose "Open" under "File" (or press CTRL+O).
- Click "Browse" in the box that appears.
- Now find your HTML document and click "Open".
It now should say "Hurrah! This is my first website." in your browser. Congratulations!
If you absolutely want the whole world to see your masterpiece right away, you can jump to Lesson 13 and learn how to upload your page to the Internet. Otherwise, be patient and read on. The fun has just begun.
.
Lesson 4: What have you learned so far?
Always start with the basic template we made in the previous lesson:
 <html>
   <head>
   <title></title>
   </head>

   <body>
   </body>

 </html>
In the head section, always write a title:
<title>The title of your page</title>. Notice how the title will be shown in the upper left corner of your browser:
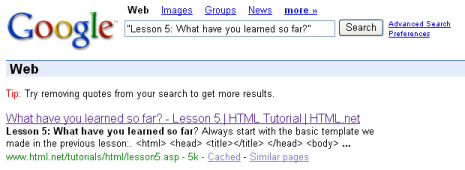
The title is especially important because it is used by search engines (such as Google) to index your website and is shown in the search results.
In the body section, you write the actual content of the page. You already know some of the most important elements:
 <p>Is used for paragraphs.</p>
 <em>Emphasis text.</em>
 <h1>Heading</h1>
 <h2>Subhead</h2>
 <h3>Sub-subhead</h3>
Lesson 5: A few more elements
Did you manage to make a few pages on your own? If not, here is an example:
 <html>

   <head>
   <title>My website</title>
   </head>

   <body>
   <h1>A Heading</h1>
   <p>text, text text, text</p>
   <h2>Subhead</h2>
   <p>text, text text, text</p>
   </body>

 </html>
Now what?
Now it is time to learn seven new elements.In the same way you emphasise the text by putting it between the openning tag
<em> and the closing tag </em>, you can give stronger emphasis by using the openning tag <strong> and the closing tag </strong>.Example 1:
<strong>Stronger emphasis.</strong>
Stronger emphasis.
Likewise, you can make your text smaller using small:Example 2:
<small>This should be in small.</small>
This should be in small.
Can I use several elements at the same time?
You can easily use several elements at the same time as long as you avoid overlapping elements. This is best illustrated by an example:Example 3:
If you want to emphasise small text, it must be done like this:
<em><small>Emphasised small text</small></em>
<em><small>Emphasise small text</em></small>
More elements!
As mentioned in Lesson 3 there are elements which are opened and closed in the same tag. These so-called empty elements are not connected to a specific passage in the text but rather are isolated labels. An example of such a tag is<br /> which creates a forced line break:Example 4:
Some text<br /> and some more text in a new line
Some text
and some more text in a new line
Notice that the tag is written as a contraction of an opening and closing tag with an empty space and a forward slash at the end: and some more text in a new line
<br />.Another element that is opened and closed in the same tag is
<hr /> which is used to draw a horizontal line ("hr" stands for "horizontal rule"):Example 5:
<hr />
ul, ol and li. These elements are used when you want to make lists.ul is short for "unordered list" and inserts bullets for each list item. ol is short for "ordered list" and numbers each list item. To make items in the list use the li tag ("list item"). Confused? See the examples:Example 7:
 <ul>
   <li>A list item</li>
   <li>Another list item</li>
 </ul>
- A list item
- Another list item
 <ol>
   <li>First list item</li>
   <li>Second list item</li>
 </ol>
- First list item
- Second list item
Phew! Is that all?
That is all for now. Again, experiment and make your own pages using some of the seven new elements you learned in this lesson:
 <strong>Stronger emphasis</strong>
 <small>Small text</small>
 <br /> Line shift
 <hr /> Horizontal line
 <ul>List</ul>
 <ol>Ordered list</ol>
 <li>List item</li>
What is that supposed to mean?
Nobody becomes a good website creator by learning the examples in this tutorial. What you get in this tutorial is simply a basic understanding of the building blocks - to become good you must use the building blocks in new and creative ways.
So, get out in the deep water and stand on your own two feet... Okay, maybe not. But give it a go and experiment with what you have learned.
So what's next?
Try to create a few pages yourself. For instance, make a page with a title, a heading, some text, a subhead and some more text. It is perfectly okay to look in the tutorial while you make your first pages. But later, see if you can do it on your own - without looking.
Lesson 6: Attributes
You can add attributes to a number of elements.
What is an attribute?
As you probably remember, elements give structure to a HTML document and tells the browser how you want your website to be presented (for example,
<br /> informs the browser to make a line break). In some elements you can add more information. Such additional information is called an attribute.
Example 1:
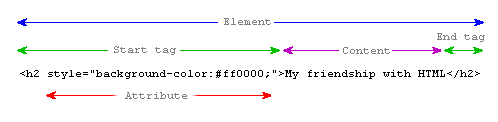
<h2 style="background-color:#ff0000;">My friendship with HTML</h2>
Attributes are always written within a start tag and are followed by an equals sign and the attribute details written between inverted commas. The semicolon after the attribute is for separating different style commands. We will get back to that later.
What is the catch?
There are many different attributes. The first one you will learn is style. With the style attribute you can add layout to your website. For instance a background colour:
Example 2:
 <html>

   <head>
   </head>

   <body style="background-color:#ff0000;">
   </body>

 </html>
will show a completely red page in the browser - go ahead and see for yourself. We will explain in greater detail how the colour system works in a few moments.
Note that some tags and attributes use US spelling i.e. color instead of colour. It is important that you are careful to use the same spelling as we use in the examples in this tutorial - otherwise, browsers will not be able to understand your codes. Also, don't forget to always close the inverted commas (quotation marks) after an attribute.
How did the page become red?
In the above example, we asked for the background colour with the code "#ff0000". This is the colour code for red using so called hexadecimal numbers (HEX). Each colour has its own hexadecimal number. Here are some examples:
White: #ffffff
Black: #000000 (zeros)
Red: #ff0000
Blue: #0000ff
Green: #00ff00
Yellow: #ffff00
Black: #000000 (zeros)
Red: #ff0000
Blue: #0000ff
Green: #00ff00
Yellow: #ffff00
A hexadecimal colour code consists of # and six digits or letters. There are more than 1000 HEX codes and it is not easy to figure out which HEX code is tied to a specific colour. To make it easier we have made a chart of the 216 most commonly used colours:
Explanatory note on Hex Colors
Web colors are colors used in designing web pages, and the methods for describing and specifying those colors.Authors of web pages have a variety of options available for specifying colors for elements of web documents. Colors may be specified as an RGB triplet in hexadecimal format (a hex triplet); they may also be specified according to their common English names in some cases. Often a color tool or other graphics software is used to generate color values.
The first versions of Mosaic and Netscape Navigator used the X11 color names as the basis for their color lists, as both started as X Window System applications.
Web colors have an unambiguous colorimetric definition, sRGB, which relates the chromaticities of a particular phosphor set, a given transfer curve, adaptive whitepoint, and viewing conditions. These have been chosen to be similar to many real-world monitors and viewing conditions, so that even without color management rendering is fairly close to the specified values. However, user agents vary in the fidelity with which they represent the specified colors. More advanced user agents use color management to provide better color fidelity; this is particularly important for Web-to-print applications.
Hex triplet
A hex triplet is a six-digit, three-byte hexadecimal number used in HTML, CSS, SVG, and other computing applications, to represent colors. The bytes represent the red, green and blue components of the color. One byte represents a number in the range 00 to FF (in hexadecimal notation), or 0 to 255 in decimal notation. This represents the least (0) to the most (255) intensity of each of the color components. The hex triplet is formed by concatenating three bytes in hexadecimal notation, in the following order:
Byte 1: red value (color type red)
Byte 2: green value (color type green)
Byte 3: blue value (color type blue)
For example, consider the color where the red/green/blue values are decimal numbers: red=36, green=104, blue=160 (a greyish-blue color). The decimal numbers 36, 104 and 160 are equivalent to the hexadecimal numbers 24, 68 and A0 respectively. The hex triplet is obtained by concatenating the 6 hexadecimal digits together, 2468A0 in this example.
Note that if any one of the three color values is less than 16 (decimal) or 10 (hex), it must be represented with a leading zero so that the triplet always has exactly six digits. For example, the decimal triplet 4, 8, 16 would be represented by the hex digits 04, 08, 10, forming the hex triplet 040810.
The number of colors that can be represented by this system is
256 \times 256 \times 256 = 16,777,216
An abbreviated, three (hexadecimal) digit form is sometimes used.[1] Expanding this form to the six-digit form is as simple as doubling each digit: 09C becomes 0099CC. This allows each color value to cover its full range from 00 to FF. However, the three-digit form is not interpreted correctly in some versions of Opera.
Converting RGB to hexadecimal
Converting a decimal RGB value to a hexadecimal value is fairly straightforward. RGB values are usually given in the 0-255 range; if they are in the 0-1 range, the values are multiplied by 255 before conversion. This number divided by 16 (integer division; ignoring any remainder) gives us the first hexadecimal digit (between 0 and F, where the letters A to F represent the numbers 10 to 15. See hexadecimal for more details). The remainder gives us the second hexadecimal digit. For instance the RGB value 201 divides into 12 groups of 16, thus the first digit is C. A remainder of 9 gives us the hexadecimal number C9. This process is repeated for each of the three color values. Most modern operating systems have a built-in calculator to perform conversions between number bases and this can also be done with some hand-held calculators. This task can also be carried out using various web resources.
Web-safe color
Another set of 216 color values is commonly considered to be the "web-safe" color palette, developed at a time when many computer displays were only capable of displaying 256 colors. A set of colors was needed that could be shown without dithering on 256-color displays; the number 216 was chosen partly because computer operating systems customarily reserved sixteen to twenty colors for their own use; it was also selected because it allows exactly six shades each of red, green, and blue (6 × 6 × 6 = 216).
The list of colors is often presented as if it has special properties that render them immune to dithering. In fact, on 256-color displays applications can set a palette of any selection of colors that they choose, dithering the rest. These colors were chosen specifically because they matched the palettes selected by the then leading browser applications. Fortunately, there were not radically different palettes in use in different popular browsers.
"Web-safe" colors had a flaw in that, on systems such as X11 where the palette is shared between applications, smaller color cubes (5x5x5 or 4x4x4) were often allocated by browsers — thus, the "web safe" colors would actually dither on such systems. Better results were obtained by providing an image with a larger range of colors and allowing the browser to quantize the color space if needed, rather than suffer the quality loss of a double quantization.
As of 2007, personal computers typically have at least 16-bit color and usually 24-bit (TrueColor). Even mobile devices have at least 16-bit color, driven by the inclusion of cameras on cellphones. The use of "web-safe" colors has fallen into practical disuse, but persisted in culture.
The web-safe palette system persists as being the palette with the greatest number of distinct colors, where each color can be distinguished individually by human eyes. This led to the use of web-safe colors in anti-phishing systems.
The "web-safe" colors do not all have names, but each can be specified by an RGB triplet. Below are the values for the 6 shades of each color out of 256 possible color shades.
Six shades of each color digit
hexadecimal decimal
0 00 0
3 33 51
6 66 102
9 99 153
C or (12) CC 204
F or (15) FF 255
The following table shows all of the "web-safe" colors, underlining the really-safe colors. The lack of gamma correction means that the six desired intensities 0%, 20%, 40%, 60%, 80%, and 100% are displayed as 0%, 2%, 10%, 28%, 57%, and 100% on a Windows standard 2.5 gamma CRT or LCD, making most colors very dark. The intensities at the low end of the range, especially 0 and 3, are nearly indistinguishable from each other:
Designers were often encouraged to stick to these 216 "web-safe" colors in their websites; however, 8-bit color displays were much more common when the 216-color palette was developed than they are now. David Lehn and Hadley Stern have since discovered that only 22 of the 216 colors in the web-safe palette are reliably displayed without inconsistent remapping on 16-bit computer displays. They called these 22 colors the "really safe" palette; it consists mainly of shades of green and yellow, as can be seen in the table above, where the "really safe" colors are underlined
216 Web Safe Colour Chart.
FFFFFF
|
FFCCFF
|
FF99FF
|
FF66FF
|
FF33FF
|
FF00FF
|
FFFFCC
|
FFCCCC
|
FF99CC
|
FF66CC
|
FF33CC
|
FF00CC
|
FFFF99
|
FFCC99
|
FF9999
|
FF6699
|
FF3399
|
FF0099
|
FFFF66
|
FFCC66
|
FF9966
|
FF6666
|
FF3366
|
FF0066
|
FFFF33
|
FFCC33
|
FF9933
|
FF6633
|
FF3333
|
FF0033
|
FFFF00
|
FFCC00
|
FF9900
|
FF6600
|
FF3300
|
FF0000
|
CCFFFF
|
CCCCFF
|
CC99FF
|
CC66FF
|
CC33FF
|
CC00FF
|
CCFFCC
|
CCCCCC
|
CC99CC
|
CC66CC
|
CC33CC
|
CC00CC
|
CCFF99
|
CCCC99
|
CC9999
|
CC6699
|
CC3399
|
CC0099
|
CCFF66
|
CCCC66
|
CC9966
|
CC6666
|
CC3366
|
CC0066
|
CCFF33
|
CCCC33
|
CC9933
|
CC6633
|
CC3333
|
CC0033
|
CCFF00
|
CCCC00
|
CC9900
|
CC6600
|
CC3300
|
CC0000
|
99FFFF
|
99CCFF
|
9999FF
|
9966FF
|
9933FF
|
9900FF
|
99FFCC
|
99CCCC
|
9999CC
|
9966CC
|
9933CC
|
9900CC
|
99FF99
|
99CC99
|
999999
|
996699
|
993399
|
990099
|
99FF66
|
99CC66
|
999966
|
996666
|
993366
|
990066
|
99FF33
|
99CC33
|
999933
|
996633
|
993333
|
990033
|
99FF00
|
99CC00
|
999900
|
996600
|
993300
|
990000
|
66FFFF
|
66CCFF
|
6699FF
|
6666FF
|
6633FF
|
6600FF
|
66FFCC
|
66CCCC
|
6699CC
|
6666CC
|
6633CC
|
6600CC
|
66FF99
|
66CC99
|
669999
|
666699
|
663399
|
660099
|
66FF66
|
66CC66
|
669966
|
666666
|
663366
|
660066
|
66FF33
|
66CC33
|
669933
|
666633
|
663333
|
660033
|
66FF00
|
66CC00
|
669900
|
666600
|
663300
|
660000
|
33FFFF
|
33CCFF
|
3399FF
|
3366FF
|
3333FF
|
3300FF
|
33FFCC
|
33CCCC
|
3399CC
|
3366CC
|
3333CC
|
3300CC
|
33FF99
|
33CC99
|
339999
|
336699
|
333399
|
330099
|
33FF66
|
33CC66
|
339966
|
336666
|
333366
|
330066
|
33FF33
|
33CC33
|
339933
|
336633
|
333333
|
330033
|
33FF00
|
33CC00
|
339900
|
336600
|
333300
|
330000
|
00FFFF
|
00CCFF
|
0099FF
|
0066FF
|
0033FF
|
0000FF
|
00FFCC
|
00CCCC
|
0099CC
|
0066CC
|
0033CC
|
0000CC
|
00FF99
|
00CC99
|
009999
|
006699
|
003399
|
000099
|
00ff66
|
00cc66
|
009966
|
006666
|
003366
|
000066
|
00FF33
|
00CC33
|
009933
|
006633
|
003333
|
000033
|
00FF00
|
00CC00
|
009900
|
006600
|
003300
|
000000
|
You can also use the English name for the most common colours (white, black, red, blue, green and yellow)
Safest web colorsDesigners were often encouraged to stick to these 216 "web-safe" colors in their websites; however, 8-bit color displays were much more common when the 216-color palette was developed than they are now. David Lehn and Hadley Stern have since discovered that only 22 of the 216 colors in the web-safe palette are reliably displayed without inconsistent remapping on 16-bit computer displays. They called these 22 colors the "really safe" palette; it consists mainly of shades of green and yellow, as can be seen in the table above, where the "really safe" colors are underlined.
.
Example 3:
<body style="background-color: red;">
Enough about colours. Let's get back to the attributes.
Which elements can use attributes?
Different attributes can be applied to most elements.
You will often use attributes in tags such as the body tag while you will rarely use attributes in, for example, a br tag since a line break normally is a line break without any parameters to adjust.
Just as there are many different elements, so there are many different attributes. Some attributes are tailor made for one particular element while others can be used for many different element. And vice versa: some elements can only contain one kind of attribute while others can contain many.
It may sound a bit confusing but once you get acquainted with the different attributes it is actually very logical and you will soon see how easy they are to use and how many possibilities they provide.
This tutorial will introduce you to the most important attributes.
Exactly what parts does an element consist of?
Generally an elements consist of a start tag with or without one or more attributes, some content and an end tag. Simple as that. See the illustration below.
Lesson 7: Links
In this lesson, you will learn how to make links between pages.
What do I need to make a link?
To make links, you use what you always use when coding HTML: an element. A simple element with one attribute and you will be able to link to anything and everything. Here is an example of what a link to HTML.net could look like:
Example 1:
<a href="http://www.html.net/">Here is a link to HTML.net</a>
Would look like this in the browser:
Here is a link to HTML.net
The element
a stands for "anchor". And the attribute href is short for "hypertext reference", which specifies where the link leads to - typically an address on the internet or a file name.
In the above example the attribute
href has the value "http://www.html.net", which is the full address of HTML.net and is called a URL (Uniform Resource Locator). Note that "http://" must always be included in URLs. The sentence "Here is a link to HTML.net" is the text that is shown in the browser as the link. Remember to close the element with an </a>.What about links between my own pages?
If you want to make a link between pages on the same website, you do not need to spell out the entire address (URL) for the document. For example, if you have made two pages (let us call them page1.htm and page2.htm) and saved them in the same folder you can make a link from one page to the other by only typing the name of the file in the link. Under such circumstances a link from page1.htm to page2.htm could look like this:
Example 2:
<a href="page2.htm">Click here to go to page 2</a>
If page 2 were placed in a subfolder (named "subfolder"), the link could look like this:
Example 3:
<a href="subfolder/page2.htm">Click here to go to page 2</a>
The other way around, a link from page 2 (in the subfolder) to page 1 would look like this:
Example 4:
<a href="../page1.htm">A link to page 1</a>
"../" points to the folder one level up from position of the file from which the link is made. Following the same system, you can also point two (or more) folders up by writing "../../".
Did you understand the system? Alternatively, you can always type the complete address for the file (URL).
What about internal links within a page?
You can also create internal links within a page - for example a table of contents at the top with links to each chapter below. All you need to use is a very useful attribute called
id (identification) and the symbol "#".
Use the
id attribute to mark the element to which you want to link. For example:
<h1 id="heading1">heading 1</h1>
You can now create a link to that element by using "#" in the link attribute. The "#" must be followed by the
id of the tag you want to link to. For example:
<a href="#heading1">Link to heading 1</a>
All will become clear with an example:
Example 5:
 <html>

   <head>
   </head>

   <body>

  <p><a href="#heading1">Link to heading 1</a></p>
  <p><a href="#heading2">Link to heading 2</a></p>

  <h1 id="heading1">heading 1</h1>
  <p>Text text text text</p>

  <h1 id="heading2">heading 2</h1>
  <p>Text text text text</p>

   </body>

 </html>
will look like this in the browser (click on the two links):
Link to heading 1
Link to heading 2
Link to heading 2
Heading 1
Text text text textHeading 2
Text text text text
(Note: An id attribut must start with a letter)
Can I link to anything else?
You can also make a link to an e-mail address. It is done in almost the same way as when you link to a document:
Example 6:
<a href="mailto:nobody@html.net">Send an e-mail to nobody at ak.skmu@gmail.com</a>will look like this in the browser: Send an e-mail to nobody atak.skmu@gmail.com
The only difference between a link to an e-mail and a link to a file is that instead of typing the address of a document, you type
mailto: followed by an e-mail address. When the link is clicked, the default e-mail program opens with a new blank message addressed to the specified e-mail address. Please note that this function will only work if there is an e-mail program installed on your computer. Give it a try!Are there any other attributes I should know of?
To create a link, you always have to use the
href attribute. In addition, you can also put a title on your link:Example 7:
<a href="http://www.html.net/" title="Visit HTML.com and learn HTML">HTML.com</a>
Would look like this in the browser:
HTML.com
The title attribute is used to type a short description of the link. If you - without clicking - place the cursor over the link, you will see the text "Visit HTML.comand learn HTML" appears.
Lesson 8: Images
Wouldn't it be great if you could have an image of and music legend sonu nigam right in the centre of your page?
That sounds like a bit of a challenge...
Maybe, but in fact it is pretty easy to do. All you need is an element:
Example 1:
<img src="sonunigam.jpg" alt="sonunigam" />
would look like this in the browser:
All you need do is first tell the browser that you want to insert an image (
img) and then where it is located (src, short for "source"). Do you get the picture?
Notice how the
img element is opened and closed using the same tag. Like the <br /> tag, it is not tied to a piece of text.
"david.jpg" is the name of the image file you want to insert in your page. ".jpg" is the file type of the image. Just like the extension ".htm" shows that a file is an HTML document, ".jpg" tells the browser that a file is a picture. There are three different types of image file types you can insert into your pages:
- GIF (Graphics Interchange Format)
- JPG / JPEG (Joint Photographic Experts Group)
- PNG (Portable Network Graphics)
GIF images are usually best for graphics and drawings, while JPEG images are usually better for photographs. This is for two reasons: first, GIF images only consist of 256 colours, while JPEG images comprise of millions of colours and second, the GIF format is better at compressing simple images, than the JPEG format which is optimized for more complex images. The better the compression, the smaller the size of the image file, the faster your page will load. As you probably know from your own experience, unnecessarily 'heavy' pages can be extremely annoying for the user.
Traditionally, the GIF and JPEG formats have been the two dominant image types, but lately, the PNG format has become more and more popular (primarily at the expense of the GIF format). The PNG format contains in many ways the best of both the JPEG and GIF format: millions of colours and effective compressing.
Where do I get my images from?
To make your own images, you need an image editing program. An image editing program is one of the most essential tools you need to create beautiful websites.
Unfortunately, no good image editing programs comes with Windows or other operating systems. Thus, you might consider investing in either Paint Shop Pro, PhotoShop or Macromedia Fireworks, which are three of the best image editing programs currently on the market.
However, as we said before, it will not be necessary to buy expensive programs to complete this tutorial. For now, you can download the excellent image editing program IrfanView which is so-called freeware and therefore costs nothing.
Or you can just borrow images from other sites by downloading them. But please be careful not to violate copyrights when downloading pictures. Still, it's useful to know how to download pictures, so here's how you do it:
- Right-click on an image on any image on the Internet.
- Choose "Save picture as..." in the menu that appears.
Is that all I need to know about images?
There are a few more things you should know about images.
First, you can easily insert pictures located in other folders, or even pictures that are located on other websites:
Example 2:
<img src="images/logo.png" />
Example 3:
<img src="http://www.html.net/logo.png" />
Second, images can be links:
Example 4:
 <a href="http://www.html.net">
 <img src="logo.png" /></a>
will look like this in the browser (try clicking on the image):
Are there any other attributes I should know about?
You always need to use the attribute
src, which tells the browser where the image is located. Besides that, there are a number of other attributes which can be useful when inserting images.
The
alt attribute is used to give an alternate description of an image if, for some reason, the image is not shown for the user. This is especially important for users with impaired vision, or if the page is loaded very slowly. Therefore, always use the alt attribute:
Example 5:
<img src="logo.gif" alt="HTML.net logo" />
Some browsers let the text of the alt attribute appear as a small pop-up box when the user places their cursor over the picture. Please note that when using the
alt attribute, the aim is to provide an alternative description of the picture. The alt attribute should not be used to create special pop-up messages for the user since then visually impaired users will hear the message without knowing what the picture is.
The
title attribute can be used to add information to the image:
Example 6:
<img src="logo.gif" title="Learn HTML from HTML.net" />
Will look like this in the browser:
If you, without clicking, place the cursor over the image, you will see the text "Learn HTML from HTML.net" appear as a pop-up box.
Two other important attributes are
width and height:
Example 7:
<img src="logo.png" width="141px" height="32px" />
will look like this in the browser:
The
width and height attributes can be used to set the height and width of an image. The value that is used to set the width and height is pixels. Pixels are the units of measurement used to measure the resolution of screens. (The most common screen resolution is 1024x768 pixels). Unlike centimetres, pixels are relative units of measurement which depend on the resolution of the screen. To a user with a high screen resolution, 25 pixels may correspond to 1 centimetre, while the same 25 pixel in a low screen resolution may correspond to 1.5 centimetres on the screen.
If you do not set the width and height, the image will be inserted in its actual size. But with width and height you can manipulate the size:
Example 8:
<img src="logo.gif" width="32px" height="32px" />
will look like this in the browser:
However, it is worth keeping in mind that the actual size in kilobytes of the image file will remain the same so it will take the same time to load the image as it did before, even though it appears smaller on the screen. Therefore, you should never decrease the image size by using the width and height attributes. Instead, you should always resize your images in an image editing program to make your pages lighter and faster.
That said, it is still a good idea to use the width and height attributes because the browser will then be able to detect how much space the image will need in the final page layout before the image is fully downloaded. This allows your browser to set up the page nicely in a quicker way.
That's enough about David Hasselhoff and images for nowLesson 9: Tables
Tables are used when you need to show "tabular data" i.e. information that is logically presented in rows and columns.
Is it difficult?
Building tables in HTML may at first seem complicated but if you keep cool and watch your step, it is actually strictly logical - just like everything else in HTML.
Example 1:
 <table>
   <tr>
  <td>Cell 1</td>
  <td>Cell 2</td>
   </tr>
   <tr>
  <td>Cell 3</td>
  <td>Cell 4</td>
   </tr>
 </table>
Will look like this in the browser:
| Cell 1 | Cell 2 |
| Cell 3 | Cell 4 |
What's the difference between <tr> and <td>?
As you will see from the above example, this is probably the most complicated HTML example we have given you so far. Let's break it down and explain the different tags:
3 different elements are used to insert tables:
- The opening tag
<table>and the closing tag</table>starts and ends the table. Logical. <tr>stands for "table row" and starts and ends horizontal rows. Still logical.<td>is short for "table data". This tag starts and ends each cell in the rows of your table. All simple and logical.
Here is what happens in Example 1: the table starts with a
<table>, followed by a <tr>, which indicates the beginning of a new row. Two cells are inserted in this row: <td>Cell 1</td> and <td>Cell 2</td>. The row is hereafter closed with a </tr> and a new row <tr> begins immediately after. The new row also contains two cells. The table is closed with </table>.
Just to make it clear: rows are horizontal lines of cells and columns are vertical lines of cells:
| Cell 1 | Cell 2 |
Lesson 10: More about tables
The title "More about tables" may sound a bit boring. But look at the positive side, when you master tables, there is absolutely nothing about HTML that will knock you out.
What is left then?
The two attributes
colspan and rowspan are used when you want to create fancy tables.Colspan is short for "column span". Colspan is used in the <td> tag to specify how many columns the cell should span:
Example 1:
 <table border="1">
   <tr>
  <td colspan="3">Cell 1</td>
   </tr>
   <tr>
  <td>Cell 2</td>
  <td>Cell 3</td>
  <td>Cell 4</td>
   </tr>
 </table>
Will look like this in the browser:
| Cell 1 | ||
| Cell 2 | Cell 3 | Cell 4 |
By setting
colspan to "3", the cell in the first row spans three columns. If we instead had set colspan to "2", the cell would only have spanned two columns and it would have been necessary to insert an additional cell in the first row so that the number of columns will fit in the two rows.
Example 2:
 <table border="1">
   <tr>
  <td colspan="2">Cell 1</td>
  <td>Cell 2</td>
   </tr>
   <tr>
  <td>Cell 3</td>
  <td>Cell 4</td>
  <td>Cell 5</td>
   </tr>
 </table>
Will look like this in the browser:
| Cell 1 | Cell 2 | |
| Cell 3 | Cell 4 | Cell 5 |
What about rowspan?
As you might already have guessed,
rowspan specifies how many rows a cell should span over:
Example 3:
 <table border="1">
   <tr>
  <td rowspan="3">Cell 1</td>
  <td>Cell 2</td>
   </tr>
   <tr>
  <td>Cell 3</td>
   </tr>
   <tr>
  <td>Cell 4</td>
   </tr>
 </table>
Will look like this in the browser:
| Cell 1 | Cell 2 |
| Cell 3 | |
| Cell 4 |
In the example above
rowspan is set to "3" in Cell 1. This specifies that the cell must span over 3 rows (its own row plus an additional two). Cell 1 and Cell 2 are thereby in the same row, while Cell 3 and Cell 4 form two independent rows.
Confused? Well, it is not uncomplicated and it is easy to lose track. Therefore, it might be a good idea to draw the table on a piece of paper before you begin with the HTML.
Not confused? Then go ahead and create a couple of tables with both
colspan and rowspan on your own.Lesson 11: Layout (CSS)
Wouldn't be great if you could give your pages the layout they deserve?
Sure, but how?
To give your website layout use Cascading Style Sheets (CSS). In this lesson you will get a short introduction to CSS.
CSS is the better half of HTML. And in coding, there is no equality of status: HTML takes care of the rough stuff (the structure), while CSS gives it a nice touch (layout).
As shown in Lesson 6, CSS can be added with the style attribute. For example, you can set the font type and size on a paragraph:
Example 1:
 <p style="font-size:20px;">This is typed in size 20px</p>
 <p style="font-family:courier;">This is typed in Courier</p>
 <p style="font-size:20px; font-family:courier;">This is typed in Courier size 20px</p>
Will look like this in the browser:
This is typed in size 20px
This is typed in Courier
This is typed in Courier size 20px
In the example above we use the
style attribute to specify the type of font to be used (with the command font-family) and the font size (with the command font-size). Notice how in the last paragraph we set both the font type and size with a separating semicolon.It seems like a lot of work?
One of the smart features of CSS is the possibility to manage your layout centrally. Instead of using the
style attribute in each tag, you can tell the browser once how it must layout all the text on the page:
Example 2:
 <html>

   <head>
   <title>My first CSS page</title>

   <style type="text/css">
    h1 {font-size: 30px; font-family: arial;}
    h2 {font-size: 15px; font-family: courier;}
    p {font-size: 8px; font-family: "times new roman";}
   </style>

   </head>

   <body>
   <h1>My first CSS page</h1>
   <h2>Welcome to my first CSS page</h2>
   <p>Here you can see how CSS works </p>
   </body>

 </html>
In the example above CSS has been inserted in the head section and therefore applies to the entire page. To do this, just use the tag
<style type="text/css"> which tells the browser that you are typing CSS.
In the example all headings on the page will be in Arial in size 30px. All subheads will in Courier size 15. And all text in normal paragraphs will be in Times New Roman size 8.
Another option is to type the CSS in a separate document. With a separate CSS document you can manage the layout of many pages all at once. Pretty smart if you want to change the font type or size on a large website with hundreds or thousands of pages. We won't go into that now but you can learn it later in our CSS tutorial.
What else can I do with CSS?
CSS can be used for much more than specifying font types and sizes. For example, you can add colours and backgrounds. Here are some examples for you to experiment with:
 <p style="color:green;">Green text</p>

 <h1 style="background-color: blue;">Heading on blue background</h1>

 <body style="background-image: url('http://www.html.net/logo.png');">
Try inserting the examples in some of your pages - both as shown above and also as CSS inserted in the head section.
Is CSS nothing but colours and font types?
Besides adding layout such as colors, font types etc., CSS can also be used to control the page setup and presentation (margins, float, alignment, width, height etc.). By regulating the different elements with CSS you are able to layout your pages elegantly and precisely.
Example 3:
<p style="padding:25px;border:1px solid red;">I love CSS</p>
Will look like this in the browser:
I love CSS
With the property
float an element can either be floated to the right or to the left. The following example illustrates the principle:
Example 4:
 <img src="bill.jpg" alt="Bill Gates" style= "float:left;" />

 <p>Lorem ipsum dolor sit amet, consectetuer adipiscing elit,
  sed diam nonummy nibh euismod tincidunt ut laoreet dolore
  magna aliquam erat volutpat. Ut wisi enim ad minim veniam,
  quis nostrud exerci tation ullamcorper suscipit
  lobortis nisl ut aliquip ex ea commodo consequat...</p>
Will look like this in the browser:
 Lorem ipsum dolor sit amet, consectetuer adipiscing elit, sed diam nonummy nibh euismod tincidunt ut laoreet dolore magna aliquam erat volutpat. Ut wisi enim ad minim veniam, quis nostrud exerci tation ullamcorper suscipit lobortis nisl ut aliquip ex ea commodo consequat...
In the example, one element (the image) floats to the left and the other element (the text) fills the hole.
With the property
position, you can place an element exactly where you want it in your page:
Example 5:
<img src="bill.jpg" alt="Bill Gates" style="position:absolute;bottom:50px;right:10px;" />
In the example the image is placed 50 pixels from the bottom and 10 pixels from the right in the browser. But you can place it exactly where you want it. Give it a try.
Lesson 12: Uploading pages
Until now, only you have had the satisfaction of viewing your pages. Now it is time for the rest of the world to see your masterpieces.
Is the world ready for that?
The world is ready - you soon will be too. To get your website on the internet, you just need some server space and a free FTP program.
If you have Internet access, you might already have some free server space for your website. Your server space will then probably be called something like http://home.provider.com/~usernumber. But you might need to activate it first. Read more about this in the papers from your Internet provider or on their support pages.
Another option is to get some free server space on the Internet. In the same way that you set up an e-mail account (at for example Hotmail), you can register for free server space on the Internet.
To have access to the server, you need to know the "Host Name" (For example, ftp.htmlnet.site50.net) and have your username and password ready.
Is that all I need?
To access the server and upload your pages, you also need an FTP program. FTP is short for File Transfer Protocol. A FTP program is used to connect two computers over the Internet so that you can transfer files from your computer to another computer (the server). You might not have such a program yet, but fortunately, this can be downloaded for free.
There are many different FTP programs. One of the better is FileZilla, which is entirely free. So now you can download FileZilla at filezilla.sourceforge.net.
And how do I upload the pages?
Described below is how you upload your pages to a free account at 000webhost.com with FileZilla. But the procedure is, more or less, the same for all providers and FTP programs.
Open the FTP program while connected to the Internet. Insert "Host Name" ("ftp.htmlnet.site50.net" under "Address"), username (under "User") and password (under "Password") and click "Connect". You should now have access to the server. In one side of the program you can see the contents of your computer ("Local Site"), and in the other side, you can see the content of the server ("Remote Site"):
Find your HTML documents and images on your computer (on the "Local site") and transfer them to the server (the "Remote site") by double clicking on them. Now the whole world can see them! (For example, at the address http://htmlnet.site50.net/page1.htm).
Name one of the pages "index.htm" (or "index.html") and it will automatically become the start page. i.e. if you type http://htmlnet.site50.net (without any filename) you will actually open http://htmlnet.site50.net/index.htm.
In the long run, it might be a good idea to purchase your own domain (for example www.your-name.com or www.your-name.net) and avoid the long and complicated addresses you are being assigned by your Internet provider or from providers of free server space. You can find and purchase domains at for example Speednames or NetworkSolutions.
Lesson 13: Web standards and validation
In this lesson, you will get a little more theoretical knowledge on HTML.
What more is there to know about HTML?
HTML can be coded in many different ways. And browsers can read HTML in just as many ways. You could say that HTML has many dialects. That is why some websites look different in different browsers.
There have been attempts to make a common standard of HTML through the World Wide Web Consortium (W3C) founded by Tim Berners-Lee (yep! the great guy who invented HTML). But it has been a long and tough road.
In the old days - when browsers where something you had to pay for - Netscape was the dominate browser. Back then, the most supported HTML standard where called 2.0 and later 3.2. But with a market share of over 90% Netscape did not have to - and did not - care much about common standards. On the contrary, Netscape invented their own strange elements, which did not function in other browsers.
For many years Microsoft almost completely ignored the Internet. After a while they took up the competition with Netscape and introduced a browser. The first versions of Microsoft's browser, Internet Explorer, were not any better than Netscape at supporting the HTML standards. But Microsoft chose to give away their browser for free (always a popular thing to do) and Internet Explorer soon became the most popular browser.
From version 4 and 5 Microsoft aimed to support more and more of the HTML standards from W3C. Netscape did not manage to develop a new version of their browser and continued to distribute the outdated version 4.
The rest is history. Today the HTML standards are called 4.01 and XHTML. Now it is Internet Explorer that has a market share of over 90%. Internet Explorer still has its own strange elements but it also supports the W3C HTML standards. And so do all of the other browsers, such as Mozilla, Opera and Netscape.
So, when you code HTML following the W3C standards, you make websites that can be seen in all browsers - both now and in the future. And luckily, what you have learned in this tutorial is a new and stricter and cleaner version of HTML called XHTML.
How do I tell which version is used?
With all the different types of HTML you need to tell the browser which "dialect" your HTML is in, in your case XHTML. To do that, you use a Document Type Declaration. The Document Type Declaration is always written in the top of the document:
Example 1:
 <!DOCTYPE html PUBLIC "-//W3C//DTD XHTML 1.0 Strict//EN"
  "http://www.w3.org/TR/xhtml1/DTD/xhtml1-strict.dtd">

 <html xmlns="http://www.w3.org/1999/xhtml" lang="en">

 <head>
 <title>Title</title>
 </head>

 <body>
 <p>text text</p>
 </body>

 </html>
Besides the Document Type Declaration (the first line in the example above), which tells the browser that you want to write XHTML, you also need to insert some extra information in the html tag with the two attributes
xmlns and lang.xmlns is short for "XML-Name-Space" and should always have the value http://www.w3.org/1999/xhtml. That is all you need to know. But if you have a big hunger for complicated knowledge you can read more about namespaces on W3C's website.
In the
lang attribute you state which language the document is written in. For this the ISO 639 standard is used, which lists codes for all the languages in the world. In the example above the language are set to English ("en").
With a DTD the browser knows exactly how it should read and show your HTML. Hence, use the example above as template for all your future HTML documents.
The DTD is also important when you want to validate your pages.
Validate? Why and how should I do that?
Insert a DTD in your pages and you can always check your HTML for errors by using W3C's free validator.
To test this out, make a page and upload it to the Internet. Now, go to validator.w3.org and type the address (the URL) of your page and validate it. If your HTML is correct you will get a congratulations message. Otherwise you will get an error report telling you exactly what and where you have done something wrong. Make some errors on purpose to see what happens.
The validator is not just helpful to locate an error. Some browsers try to compensate for lack of skills among web developers by trying to fix errors in the HTML and showing the page as they guess it should look. With such browsers, you might never see an error in your own browser. However, other browsers might guess differently or not show the page at all. The validator can help you find errors you did not even know existed.
Always validate your pages to be sure they will always be shown correctly.
Lesson 14: The final tips
Congratulations, you have now reached the final lesson.
So now I know everything?
You have learned a lot and you are now capable of making your own websites! However, what you have learned are the basics and there is still a lot more to be mastered. But you now have a good foundation from which to build on.
In this last lesson, you will get some final tips:
- First, it is a good idea to maintain order and structure in your HTML documents. By posting well arranged documents you will not only show others your mastery of HTML but will also make it considerably easier for yourself to keep an overview.
- Stick to the standards and validate your pages. This cannot be stressed enough: Always write clean XHTML, use a DTD and validate your pages on validator.w3c.org.
- Give your page contents. Remember that HTML is a tool, which enables you to present information on the Internet, so make sure that there is information to present. Pretty pages may look nice but most people use the Internet to find information.
- Avoid overloading your pages with heavy images and other fancy stuff you have found on the Internet. It slows down the loading of the page and could be confusing for visitors. Pages that take more than 20 seconds to load can lose up to 50% of their visitors.
- Remember to add your website to search engines/directories so people other than your closest family can find and enjoy it. On the front page of all search engines, you will find a link to add new pages (The most important is Google, but there are also others like DMOZ, Yahoo, AltaVista, AlltheWeb and Lycos).
- In this tutorial, you have learned to use Notepad, which is a simple and very easy to use editor, but perhaps you will find it helpful to use a more advanced editor which gives a better overview and more possibilities. You can find a summary and reviews of different editors on Download.com.
How do I learn more?
First of all, it is important that you continue to work and experiment with the things you have learned in this tutorial. Study other people's websites and if you find something you like see how it was made with "View Source" (Click "View" in the menu in your browser and choose "Source").
Search the Internet for examples and articles on HTML. There are lots of websites with great contents on HTML.
Read and ask questions in the Forums. This is where you meet the real experts from whom you can learn a lot.